处理中文显示长度是英文的两倍 1 2 3 4 5 6 7 8 9 10 11 12 13 14 15 16 17 18 19 20 21 22 23 24 25 26 27 28 29 30 31 32 33 34 use 5.38 .0 ;use utf8::all;use Encode;sub calculate_display_width my $str = shift ;my $width = 0 ;foreach my $char (split // , $str) {length (encode_utf8($char)) > 1 ) ? 2 : 1 ;return $width;sub pad_to_width my ($str, $desired_width) = @_;my $current_width = calculate_display_width($str);my $padding_needed = $desired_width - $current_width;return $str . (' ' x $padding_needed);my @data = ("你好啊hello学姐" , "76.5700" , "2024-11-05 11:35:37" ],"啦啦啦" , "71.4300" , "2024-11-05 11:35:37" ]foreach my $row (@data) {my $name = pad_to_width($row->[0 ], 40 );my $value = pad_to_width($row->[1 ], 10 );my $date = pad_to_width($row->[2 ], 20 );say "$name$value$date" ;
用 length(encode_utf8("你")) 算出的宽度为 3, 但实际上应该为 2, 因此这里写成 $width += (length(encode_utf8($char)) > 1) ? 2 : 1;.
打印好看的 table 1 2 3 4 5 6 7 8 9 10 11 12 13 14 15 16 17 18 use strict;use warnings;use Text::Table;my $table = Text::Table->new("ID" , "Name" , "Age" 1 , "Alice" , 30 );2 , "Bob" , 25 );3 , "Charlie" , 35 );print $table;
处理日期以及比较大小 1 2 3 4 5 6 7 8 9 10 11 12 13 14 15 16 17 18 19 20 21 22 23 24 25 26 27 28 29 30 31 use strict;use warnings;use DateTime;use Time::Local; my $date_str1 = '2024-10-31 10:46:28' ;my $date_str2 = '2024-11-01 12:00:00' ;my $dt1 = DateTime->from_epoch(epoch => str2time($date_str1));my $dt2 = DateTime->from_epoch(epoch => str2time($date_str2));if ($dt1 < $dt2) {print "$date_str1 is earlier than $date_str2\n" ;elsif ($dt1 > $dt2) {print "$date_str1 is later than $date_str2\n" ;else {print "$date_str1 is equal to $date_str2\n" ;sub str2time my ($str) = @_;if ($str =~ /(\d{4})-(\d{2})-(\d{2})\s+(\d{2}):(\d{2}):(\d{2})/ ) {return timelocal($6, $5, $4, $3, $2 - 1 , $1); die "Invalid date format: $str" ;
处理从数据库获取的 utf-8 数据 1 2 3 4 5 6 7 8 9 10 11 12 13 use Encode;sub new_user_msg my $sth = $dbh->prepare("SELECT * FROM dev_ops_user ORDER BY id DESC LIMIT 1;" my $user = $sth->fetchrow_hashref();my $user_name = decode('utf8' , $user->{"user_name" });print ($user_name);
连接 SQLite 示例 1 2 3 4 5 6 7 8 9 10 11 12 13 14 15 16 17 18 19 20 21 22 23 24 25 use strict;use warnings;use DBI;my $dbh = DBI->connect ("dbi:SQLite:dbname=db.sqlite" , "" , "" , { RaiseError => 1 , PrintError => 0 });do ("CREATE TABLE IF NOT EXISTS users (id INTEGER PRIMARY KEY, name TEXT, age INTEGER)" );my $name = "Alice" ;my $age = 30 ;my $sth = $dbh->prepare("INSERT INTO users (name, age) VALUES (?, ?)" );print "Data inserted successfully.\n" ;
File::Slurp 处理中文字符 1 2 3 4 5 6 7 8 9 use 5.38 .0 ;use utf8::all;use lib '/home/jie/scripts/perl/' ;use File::Slurp;my $content = read_file('./01_hello-linux.md' , { binmode => ':encoding(UTF-8)' });print $content;
两个数组的差集 1 2 3 4 5 my @arr1 = qw(one two three four five) ;my @arr2 = qw(one a b one c d e two f g h two i j two) ;my %seen1 = map { $_ => 0 } @arr1;grep { ! exists $seen1{$_} } @arr2;print qq(@arr2) ;
把第一个数组的每一个元素作为一个 Hash 的键
把第二个数组的每一个元素作为 Hash 的键, 如果值不存在, 则返回
连接目录 用 File::Spec 模块:
1 2 3 4 5 6 7 8 9 10 11 12 use strict;use warnings;use File::Spec;my $dir1 = '/home/user' ;my $dir2 = 'documents' ;my $full_path = File::Spec->catdir($dir1, $dir2);print "Combined directory path: $full_path\n" ;
获取父目录 1 2 3 4 5 use File::Basename;use Cwd 'abs_path' ;my $cwd_abs_path = abs_path();my $parent_dir = dirname($cwd_abs_path);
判断一个 file handle 是否关闭 借助 fileno 函数, 其会返回文件句柄的文件描述符, 如果文件句柄已经关闭, 那么 fileno 就会返回 undef:
1 2 3 4 5 if (!defined (fileno $filehandle)) {print "Filehandle is closed\n" ;else {print "Filehandle is open\n" ;
去除数组中的重复项 可以用 List::MoreUtils 模块的 uniq 函数:
1 2 3 4 use List::MoreUtils qw(uniq) ;my @array = (1 , 2 , 2 , 3 , 4 , 4 , 5 );my @unique = uniq @array;
处理短命令行选项 使用 Getopt::Long 模块时, 开启 “bundling” 选项:
1 2 3 4 5 6 7 8 9 10 11 12 13 14 15 16 use Getopt::Long;"bundling" );my $verbose = 0 ; my $file = '' ; 'v' => \$verbose, 'f=s' => \$file) or die ("Error in command line arguments\n" );print "Verbose: $verbose\n" ;print "File: $file\n" ;
逗号分隔函数调用 1 2 3 4 5 6 7 8 9 10 11 12 13 14 15 use 5.38 .0 ;use utf8::all;use lib '/home/jie/scripts/perl/' ;my ($test1, $test2) = (hello(), world());say $test1;say $test2;sub hello return "Hello" ;sub world return "World" ;
这样的语法也是允许的. 这里加上了 (), 因此是 list 上下文.
注意:
1 2 3 4 5 6 7 8 9 10 11 12 13 14 15 use 5.38 .0 ;use utf8::all;use lib '/home/jie/scripts/perl/' ;my ($test1, $test2) = hello(), world();say $test1;say $test2;sub hello return "Hello" ;sub world return "World" ;
此时只有 $test1 被定义. 因为右侧是 scalar 上下文, 只返回了 , 左侧的值.
注意函数不加括号的语法 如:
1 2 3 4 5 6 7 8 9 10 use 5.38 .0 ;use utf8::all;use lib '/home/jie/scripts/perl/' ;sub hello my %mhash = @_;say $mhash{'test' };'test' => 1 ;
若想不加括号调用, 就需要在调用前定义.
迭代一个 hash 用 each 关键字
1 2 3 4 5 6 7 8 my %test = (hello => "world" ,"haha" => "lala" ,while ( my ($key, $value) = each %test ) {
判断一个变量是否继承自某个模块 用 isa 方法, 如:
1 2 3 4 5 6 7 8 9 10 use strict;use warnings;use Test::Simple tests => 2 ;use Date::ICal;my $ical = Date::ICal->new;defined $ical );'Date::ICal' ) );
获取一个函数属于哪一个模块 用 Devel::Peek 模块中的 CvGV() (Code value, Global Value) 函数:
1 2 3 4 use Devel::Peek qw(CvGV) ; my $name = CvGV(\&CvGV);print $name;
输出为:
在修改文件后添加前缀 用如 -ibak.* , 这里的 * 就会被替换为原来的文件名.
如:
1 2 3 4 5 6 7 8 $ ls *colors.txt*'bkp.*' -pe 's/-green-/yellow/' colors.txtls *colors.txt*
同理可以将修改后的文件放在另一个目录下:
1 2 3 4 $ mkdir backups'backups/*' -pe 's/good/nice/' t1.txt t2.txtls backups/
范围操作符的特殊用法 如, 从匹配到 A 的行开始, 一直打印到匹配 B 的行:
1 $ perl -ne 'print if /A/ .. /B/' ip.txt
也可以配合行号一起:
1 2 3 4 $ perl -ne 'print if 6 .. /utter/' ip.txt
配合 eof 函数:
1 2 3 4 5 6 $ perl -ne 'print if !(/\bba/ .. eof)' ip.txt table.txtin the park
判断是否读取到文件结尾 用 eof 函数:
1 2 3 4 5 6 7 8 9 10 11 12 'print if eof' ip.txt'print "$.:$_" if eof' ip.txt'print if eof' ip.txt table.txt
在接受输入之前做处理 利用 BEGIN {} block. 其会在接受 input 之前运行.
END {} 会在代码运行之后运行.
如:
1 2 3 4 5 6 7 8 seq 4 | perl -pE 'BEGIN{say "---"} END{say "%%%"}'
获取数组的最后一个索引 如 $#arr;
动态加载 Perl 模块 用 Module::Runtime 模块.
查看 perldoc Module::Runtime 的内容如下.
查看模块名是否符合标准 即不以数字开头, 正确使用 :: 等.
用 is_module_name 函数.
将模块名转换为路径 如将 Data::Dumper 转换为 Data/Dumper.pm.
用 module_notional_filename 函数.
加载模块aa require_module 以及 use_module 分别是 require 和 use 的 runtime 版本. (use_module 不会 import)
yada yada 语法 在定义一个函数后打算未来再实现时, 可以这样写:
1 2 3 sub future_func
也就是三个 dot.
autoboxx 可见 autobox::Core 模块:
1 2 my $len = sub length (shift ) };"hello" ->$len();
Inline file 如:
1 2 3 4 5 6 7 while (<DATA>) {print ;__DATA__ a b c d 1 2 3 4
内插表达式 用 @{[]} 语法:
1 2 3 my $x = 1 ;my $y = 2 ;print "$x + $y = @{[$x + $y]} " ;
flip-flop 1 2 3 4 while (<$fh>) {next if 1 ..100 ;
Perl 中的协程 使用 Coro 模块.
在 perldoc Coro::Intro 中可查看 tutorial.
Coro::Intro 内容 示例:
1 2 3 4 5 6 7 8 9 10 11 12 use Coro;print "async 1\n" ;print "async 2\n" ;print "main 1\n" ;print "main 2\n" ;
cede 就是 yield.
一开始运行的是主程序, 也就是主线程.
async 创建线程并将代码块放入 ready queue.
cede 将正在运行的线程放入 ready queue 并 jumps into the scheduler.
cede 其实可以写为:
1 2 3 4 sub my_cede
Semaphore 和 Lock 锁住资源, 一般用 Coro::Semaphore.
1 2 3 4 5 6 7 8 9 10 11 12 use Coro;my $sem = new Coro::Semaphore 0 ; print "unlocking semaphore\n" ;print "trying to lock semaphore\n" ;print "we got it!\n" ;
注意 guard 的使用.
Channel 用 Coro::Channel
1 2 3 4 5 6 7 8 9 10 11 12 13 14 15 16 17 18 19 use Coro;my $calculate = new Coro::Channel;my $result = new Coro::Channel;while () {my $num = $calculate->get; 2 ; for (1 , 2 , 5 , 10 , 77 ) {print "$_ ** 2 = " , $result->get, "\n" ;
Debug 用 Coro::Dubug 模块.
1 2 3 use Coro::Debug;"ps" ;
给一个 thread 添加 description 信息:
1 2 3 4 async {"cruncher" ;
其他 Intro 中还有多个实例, 如 Event Loops, File I/O, rouse function 可以参考.
安装依赖 创建一个文件 cpanfile, 在其中列出脚本所依赖的模块及其版本要求:
1 2 requires 'Module::Name' => '1.23' ;'Another::Module' => '0.45' ;
然后:
进行安装.
测试一个模块是否安装 如:
1 perl -MConfig::MVP::Reader::INI -e1
chdir 的默认参数 chdir 默认为用户的家目录.
-s $file 其在标量上下文中返回文件的大小 (用多少比特的形式).
1 2 my $size = -s "~/.zshrc" ;print $size;
在命令行检查语法错误 使用 perl -c, -c 是 check.
当前运行的 perl 文件 其值保存在 $0 中.
使用 perldoc 查看 perl 关键词 使用 -f 参数,如:
使用 perl 的 -I 参数来增加 @INC 元素 1 $ perl -Idirectory scripts
添加散列表元素 如:
1 $self->{$_} = 0 for qw(wins places shows losses) ;
perl -0ne 的用法 -0 是指定 record separator, 即记录分隔符. 由于默认的分隔符为 \0, 即文件末尾,则只会匹配一次。
使用八进制指定 \n, 其八进制 ASCII 码为 012:
使用十六进制指定 \n, 其十六进制 ASCII 码为 0x0A:
-n 是自动给代码加上 while (<>) { ... }
-e 是写代码.
-p 参数相比 -n 会省去加上 print.
1 2 3 4 5 6 while (<>) {continue {print or die "-p destination: $!\n" ;
-i 可以直接修改文件. -i.bak 表明备份文件的后缀. 其似乎会把程序内如 print 的输出重定向到命令行参数指明的文件. 要直接修改一个文件的内容就要用 -i 和 -p
JSON module of perl 可以用 PERL_JSON_BACKEND 环境变量来指定用哪一个 JSON 模块.
Json 文件, 其中的对象中的最后一个不加逗号 ,. (最后的似乎都不加)
将哈希转换为 JSON 数据:
1 2 3 4 5 6 7 8 9 10 use JSON;my $text = {"first" => "Hello" ,"second" => "World" ,"third" => "HAAH" ,my $json_text = encode_json($text);say "$json_text" ;
输出为:
1 {"first" :"Hello" ,"second" :"World" ,"third" :"HAAH" }
输出好格式可以使用 pretty 成员函数, 可以用 new 成员函数创建一个对象:
1 2 3 4 5 6 7 8 9 10 11 12 use JSON;my $text = {"first" => "Hello" ,"second" => "World" ,"third" => "HAAH" ,my $json = JSON->new;my $json_text = $json->pretty->encode($text);say "${json_text} " ;
将 JSON 格式数据转换为 Perl 语言数据:
1 2 3 4 5 6 7 8 9 10 use JSON;my $text = {"first" => "Hello" ,"second" => "World" ,"third" => "HAAH" ,my $json_text = encode_json($text);my $perl_text = decode_json($json_text)say "$json_text" ;
看下面的代码:
1 2 3 4 5 6 7 8 9 my $filename = "package.json" ;my $json = JSON->new;my $json_text = do {open my $fh, "<:encoding(UTF-8)" , "$filename" ;local $/;my $data = $json->decode($json_text);print "$data->{$_} \n" foreach keys %$data;
运行后发现, json 文件中一个键值对如:
1 2 3 4 5 6 "scripts" : { "build" : "hexo generate" , "clean" : "hexo clean" , "deploy" : "hexo deploy" , "server" : "hexo server" } ,
则 $data->{"scripts"} 是一个 HASH reference.
查找数组中含有某个元素 1 2 3 4 5 if ( grep ( /^$value$/ , @array ) ) {print "found it" ;
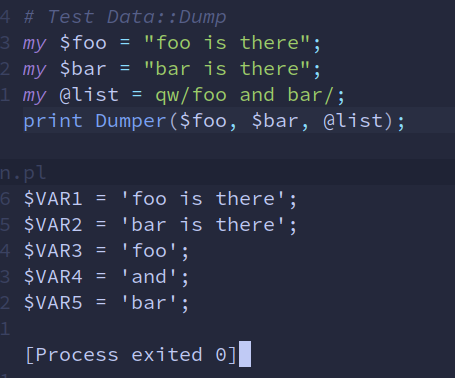
向 JSON 文件中添加内容 Data::Dumper 模块使用和作用 perldoc 中的简介是将 Perl 的数据结构 (可以给 a list of scalars or reference variables) 字符串化, 但并不是输出内容, 而是结合 print, eval 使用, 如:
1 2 3 use Data::Dumper;print Dumper($foo, $bar);
示例:
关于 open 函数和 file handle, 以及 $/ 变量 如:
1 open my $fh, '<' , $filename;
这个 $fh 这个变量中并不是保存文件内容, 获取文件内容可以用:
$/ 这个变量叫做 Input Record Separator, 是用来, “influence Perl’s idea of what a ‘line’ is”.
一般用 lines() 或 <> 读取文件之前, 都可以设置 $/. 由于 $/ 是 global 的变量, 所以不能写成 my $/, 而使用 local $/ 来修改其值.
技巧:
1 2 3 4 5 6 7 8 9 my $json = JSON->new;my $filename = 'package.json' ;open my $fh_json, "<:encoding(UTF-8)" , $filename;local $/;my $text = <$fh_json>;print $text;close $fh_json;
这里 $/ 很关键, 这里相当于是将其设置为 undef, 这样 <> 会读取整个文件的内容并返回给 $text, 如果这里没有 local $/$/ 默认的值就是 \n, <> 操作符就只能读取一行文件内容, 在这个 json 文件中就是 {, 会报错.
组织一段代码 看到这种写法:
1 2 3 4 5 6 my $json_text = do {open (my $json_fh, "<:encoding(UTF-8)" , $filename)or die ("Can't open \$filename\": $!\n" );local $/;
这里就把与获取 $json_text 变量值的代码组织在了一个代码块中, 感觉比较方便阅读.
Exporter 模块的导入方法 1 2 3 4 5 use vars qw( @ISA ) ;require Exporter;qw( Exporter ) ;
关于函数外用 my 声明的变量 其对于函数而言是全局变量, 如:
1 2 3 4 5 6 7 8 9 10 11 12 my $file_name = 'test.json' ;sub Test my $json_text = do {open my $json_fh, '<' , $file_name;local $/;print $json_text;
Test() 函数可以直接使用 $file_name 变量.
获取一个嵌套 hash 的所有 value 如:
1 2 3 4 5 6 7 8 9 my $ref_1 = {"ref_2" => {"test1" => 1 ,"test2" => 2 ,"test3" => 3 ,print "$_ \n" foreach values %{$ref_1->{"ref_2" }};
初始化列表和哈希 都是用 ().
Devel::Peek 模块可以得到更多关于 reference 的内部信息.
利用 LWP 模块发送 request 如 POST 请求:
1 2 3 4 5 6 7 8 9 10 11 12 13 14 15 16 17 18 19 20 21 22 23 24 use LWP::UserAgent;my $ua = LWP::UserAgent->new;my $server_endpoint = "http://192.168.1.1:8000/service" ;my $req = HTTP::Request->new(POST => $server_endpoint);'content-type' => 'application/json' );'x-auth-token' => 'kfksj48sdfj4jd9d' );my $post_data = '{ "name": "Dan", "address": "NY" }' ;my $resp = $ua->request($req);if ($resp->is_success) {my $message = $resp->decoded_content;print "Received reply: $messagen" ;else {print "HTTP POST error code: " , $resp->code, "n" ;print "HTTP POST error message: " , $resp->message, "n" ;
这里用到了两个模块 LWP::UserAgent 和 HTTP::Request.
版本包捆绑 参考
Perl 5.36.0 引入了版本包捆绑 (Version bundles) 功能, 如:
相当于以前的:
1 2 3 4 5 6 7 8 9 10 11 12 13 14 15 16 17 18 require v5.36 ;use strict;use warnings;use feature 'say' ;use feature 'state' ;use feature 'current_sub' ;use feature 'fc' ;use feature 'lexical_subs' ;use feature 'signatures' ;use feature 'isa' ;use feature 'bareword_filehandles' ;use feature 'bitwise' ;use feature 'evalbytes' ;use feature 'postderef_qq' ;use feature 'unicode_eval' ;use feature 'unicode_strings' ;no feature 'indirect' ;no feature 'multidimensional' ;
从网页下载文件 可以调用 shell 命令如 curl 和 wget, 也可以用模块.
使用 LWP::Simple 如:
1 2 3 4 5 6 7 8 9 10 11 use strict;use warnings;use LWP::Simple;my $url = 'http://marinetraffic2.aegean.gr/ais/getkml.aspx' ;my $file = 'data.kml' ;
使用 File::Fetch 如:
1 2 3 4 use File::Fetch;my $url = 'http://www.example.com/file.txt' ;my $ff = File::Fetch->new(uri => $url);my $file = $ff->fetch() or die $ff->error;
打印文件的某几行 如:
1 $ perl -ne 'print qq($.: $_) if 4 .. 7' fileA
范围操作符, if 之后仅仅给定一个数字范围时, 它会默默那表示行计数的 $. 来比较.
命令行中, 某些代码不放入 -n 开启的循环 可利用 BEGIN{} 和 END{}:
1 2 3 4 $ perl -nle '$count++ } END { print $count }' *.pl'$count++ } \ BEGIN { print q(Counting ) . @ARGV . q( files) } \ END { print $count ' *.pl
打印数组引用中的全部元素 需要括号: @{$array_ref};
正则表达式中替换 Unicode 使用 \x{} 的语法, 括号内是码点.
不使用 Moose 创建对象的构造函数 1 2 3 4 5 6 7 8 9 10 11 12 13 package Test;sub new my $class = shift ;my $value = shift ;return bless \$value => $class;package main;my $test_obj = Test->new(100 );
关于 Perl 中的对象 对象似乎都是引用.
区分 system() 和 backticks 的作用 直接运行系统命令, 不会返回给 Perl 变量.
可以获得命令的结果.
使用自己的代码 用:
1 2 3 BEGIN {push @INC, 'path/to/your/code' ;
或:
1 use lib 'path/to/your/code'
或改变环境变量 PERL5LIB 等的值.
一个变量的几种写法 1 2 3 $main::var;
都等价.
关于多次使用一个文件句柄 在使用过一次文件句柄后, 其中的内容就已经丢失了, 因此在同一个程序中再次用同一个文件句柄不会得到相同的输出, 需要再打开一个.
不匹配某段正则表达式 使用 !~ 操作符. 如:
或者直接写成:
Perl 中,可以使用 Data::Dumper 模块来显示引用中所有的层级关系。只需要将引用传递给 Data::Dumper 的 Dumper() 函数,就可以将引用中所有的层级关系输出到标准输
显示所有引用的层级关系 例如:
1 2 3 4 5 6 7 8 9 use Data::Dumper;my $ref = {'foo' => 'bar' ,'baz' => [ 'quux' , { 'quuux' => 'quuuux' } ]print Dumper($ref);
输出结果如下:
1 2 3 4 5 6 7 8 9 $VAR1 = {'baz' => ['quux' ,'quuux' => 'quuuux' 'foo' => 'bar'
爬虫 可以考虑 LWP 模块中的 LWP::Simple 和 LWP::UserAgent 模块.
如使用 LWP::Simple:
1 2 3 4 5 6 7 8 9 10 11 12 13 14 15 16 17 18 19 20 21 22 23 use strict;use warnings;use LWP::Simple;my $url = "http://example.com" ;my $content = get($url);open (my $fh, '>' , "example.html" );print $fh $content;close $fh;open (my $fh, '<' , 'example.html' );while (my $line = <$fh>) {if ($line =~ m/<a\s+(?:[^>]/ print "$1\n" ;close $fh;
使用 LWP::UserAgent:
1 2 3 4 5 6 7 8 9 10 11 12 13 14 15 16 17 18 19 20 use strict;use warnings;use LWP::UserAgent;my $url = 'http://example.com' ;my $ua = LWP::UserAgent->new;my $response = $ua->get($url);if ($response->is_success) {my $content = $response->decoded_content;else {die $response->status_line;
处理 HTML 可以使用 HTML::TokeParser 模块
创建子进程 使用 fork() , 父进程会先运行, 然会再运行子进程.
子进程只会复制 fork() 语句之后的程序.
实现定时任务 参考 Proc::Daemon 和 Schedule::Cron 模块.
返回局部变量的引用 Perl 似乎可以返回局部变量的引用:
1 2 3 4 5 6 7 my $test = ret_ref();print $$test;sub ret_ref my $test = 10 ;return \$test;
看到一个回答解释为:
n Perl, this allocation comes from the heap and not the stack, thus it’s still available when the routine returns.
即, Perl 在堆上分配内存而不是栈.
使用异步 利用 Future::AsyncAwait 模块.
加密 似乎都在 Digest 名称空间下.
使用 Crypt 名称空间下的模块, 如 Crypt::CBC
关于 REPL 位于模块 Devel::REPL.
关于解引用和 -> -> 就已经包含了一层解引用的含义.
Perl 中的 “Not a SCALAR reference” 错误通常表示尝试将非标量变量作为标量变量进行处理。这种错误通常发生在引用上下文中,例如在解引用或使用箭头操作符访问引用的成员时。
以下是一个示例代码,可能会导致 “Not a SCALAR reference” 错误:
1 2 3 my @array = (1 , 2 , 3 );my $ref = \@array;my $value = $$ref [0 ];
在这个例子中,我们首先定义了一个包含三个元素的数组 @array,然后使用反斜杠将其引用为 $ref,接着我们想访问数组的第一个元素,因此使用 $$ref[0] 这个语法。然而,这里发生了错误,因为 $$ref 会将 $ref 当作一个标量变量来处理,而 $ref 实际上是一个引用,不是一个标量。因此,Perl 报告 “Not a SCALAR reference” 错误。
要解决这个错误,我们需要使用正确的语法来访问引用的成员。在这个例子中,我们可以使用箭头操作符来访问数组元素,如下所示:
这里,我们使用箭头操作符 -> 将 $ref 引用的数组的第一个元素访问出来,这样就可以避免 “Not a SCALAR reference” 错误。
设置输出流 将输出流设置到标准输出:
用一个文件句柄代表输出到一个程序, 如:
1 2 my $str = "Test String" ;open my $str_fh, "|fzf" ;
用一组 keys 和 一组 values 构成 hash 如:
1 2 3 4 5 my @keys = qw(A B C D E F) ;my @values = (1 , 2 , 3 , 4 , 5 , 6 );my %hash;print $hash{A} ;
unpack 的使用示例 可以查看 perlpacktut 文档.
1 2 3 4 5 6 7 8 9 10 11 12 13 14 15 16 17 18 19 20 21 22 23 24 25 26 27 use utf8;use lib '/home/jie/scripts/perl/' ;use Data::Dumper;my $string = <<'COLUMNAR' ;1 brian d foy2 Joshua McAdams3 Joseph N Hallopen my ($fh), '<' , \$string;my $format = 'A2 @4 A10 @16 A6 @24 A*' ;my @headers = unpack $format, <$fh>; my @name;while (<$fh>) { my %hash;unpack $format, $_;push @names, \%hash;print Dumper( @names );
使用 Prima 制作界面 让一个变量成为两个类的对象 使用 bless 即可.
关于关闭文件句柄以输出缓冲区数据 当 Perl 程序还未结束时,print 到一个文件句柄的内容并不一定会立即发送。这是因为 I/O 操作在 Perl 中是缓冲的,所以 print 语句的输出可能会先存储在缓冲区中,直到满足一定条件时才会将其发送到文件。
具体来说,Perl 中的缓冲机制有三种类型:
全缓冲:当输出到一个终端或者管道时使用全缓冲,也就是缓冲区被填满后才进行输出。可以使用 $| = 0 或者 STDOUT->autoflush(0) 命令关闭全缓冲。
行缓冲:当输出到一个终端时使用行缓冲,也就是缓冲区填满一行后进行输出。可以使用 $| = 1 或者 STDOUT->autoflush(1) 命令开启行缓冲。
无缓冲:当输出到一个文件时使用无缓冲,也就是直接进行输出。可以使用 open 函数的 :raw 模式或者 binmode 函数将文件句柄设置为无缓冲模式。
如果程序在退出前没有将缓冲区中的数据发送到文件,那么这些数据就会丢失。可以使用 close 函数或者 flush 函数强制将缓冲区中的数据发送到文件。
如:
1 2 3 4 5 6 7 8 open my $fh, ">" , "output.txt" ;print $fh "hello, world\n" ;close $fh;
用 Perl 的 Git 接口 返回替换的结果 使用 /r 修饰符.
返回成功捕获的部分 注意是捕获的部分, 而不是匹配的部分.
1 my ($first_name) = $name =~ /($first_name_rx)/ ;
$first_name_rx 是一个预编译的正则表达式.
在列表上下文中, 一个成功正则表达式匹配返回由所有捕获组成的列表, 这里将第一个元素赋值给 $first_name
换回替换成功的部分 如:
1 2 my $str = 'test12kla' ;my ($test) = $str =~ s/test//r ;
输出中带颜色 使用 Term::ANSIColor 模块.
Perl, 用 map 同时处理两个数组 在Perl中,可以使用 map 函数同时处理两个或多个数组,这可以通过使用 List::MoreUtils 模块中的 zip 函数来实现。zip 函数可以将多个数组合并为一个数组,其中的每个元素是由各个数组中对应位置的元素组成的列表。
下面是一个示例,演示如何使用 map 和 zip 函数来同时处理两个数组:
1 2 3 4 5 6 7 8 9 10 use List::MoreUtils qw(zip) ;my @array1 = qw(a b c d e) ;my @array2 = qw(1 2 3 4 5) ;my @result = map { "array1: $_->[0], array2: $_->[1]" } zip(\@array1, \@array2);foreach my $value (@result) {print "$value\n" ;
在上面的示例中,@array1 和 @array2 两个数组被合并成了一个数组 @result,其中每个元素都是一个字符串,由 map 函数返回。map 函数中的参数是一个匿名子程序,该子程序接收 zip 函数返回的合并数组中的每个元素,并将它们格式化为一个字符串。在这里,我们使用 $->[0] 和 $ ->[1] 来分别访问数组中对应位置的元素。
输出结果如下:
1 2 3 4 5 6 array 1: a, array 2: 1 array 1: b, array 2: 2 array 1: c, array 2: 3 array 1: d, array 2: 4 array 1: e, array 2: 5
区分目录和文件 用 -f 和 -d.
Perl 模块依赖管理器 Carton 的使用 检查一个模块是否是核心模块 可使用 Module::CoreList 模块中的 is_core 函数.
关于 glob 其默认不会列出隐藏文件.
暂时关闭错误输出 如:
1 2 3 4 5 6 {local *STDERR;open (STDERR, '>' , '/dev/null' ) or die "Cannot open /dev/null: $!" ;die "Hi" ;
读取密码时不显示 1 2 3 use Term::ReadKey;'noecho' );0 );
printf 和 sprintf 的区别 用法类似, 但是:
printf 将格式化字符串输出到标准输出设备, sprintf 用于将格式化字符串转换成一个字符串, 不输出到屏幕printf 返回值为输出字符的长度, sprintf 返回值为字符串
import 和 unimport 具体来说,当一个模块被导入时,它的 import 方法会被调用,通常用于设置一些默认行为或者导出符号表中的子程序或变量。
相应地,当使用 no 关键字取消导入模块时,unimport 方法会被调用,通常用于取消默认行为或者清理导出的符号表
将字符串转换为 base64 编码的字符串 如:
1 2 3 4 5 use MIME::Base64;my $str = "hello world" ; my $encoded = encode_base64($str); print $encoded;
开启双向文件句柄 用 +< 表示追加模式.
用 +> 表示覆写模式. (这个好像和单纯的 > 没啥区别, 测试的时候并没有读取文件内容)
1 2 3 4 5 6 7 8 9 10 11 12 13 14 15 16 open (my $fh, '+<' , 'file.txt' ) or die "无法打开文件: $!" ;while (my $line = <$fh>) {print $line;seek ($fh, 0 , 2 );print $fh "Hello, world!\n" ;close ($fh);
正则表达式匹配时, 让所有特殊字符转移 使用 \Q 和 \E 包裹.
seek 函数的使用 1 seek FILEHANDLE, POSITION, WHENCE
WHENCE 用于设置初始位置:
0 (或者用 SEEK_SET), 设置到文件开头1 (或者用 SEEK_CUR), 设置到当前位置 (读取到哪里就是哪里)2 (或者用 SEEK_END), 设置到文件末尾
在循环中刷新 $1 等捕获变量的值 将匹配结果保存在一个变量中,并在使用完后将其清空,以避免对后续匹配的影响。
如:
1 2 3 4 5 foreach my $line (@lines) {local $1;s/(LCTL = )\d{2}/$1 66/ ;print "The first capture is $1" ;
去除两个数组中重复的部分 1 2 3 4 5 my @arr1 = qw(one two three four five) ;my @arr2 = qw(one a b one c d e two f g h two i j two) ;my %seen1 = map { $_ => 0 } @arr1;grep { ! exists $seen1{$_} or ! $seen1{$_}++ } @arr2;print qq(@arr2) ;
检测一个进程的输出 在Perl中,您可以使用IPC::Open3模块来监视一个进程的输出。该模块允许您将输入和输出重定向到另一个进程,并从标准输出中读取数据。以下是一个简单的示例:
1 2 3 4 5 6 7 use IPC::Open3;my $pid = open3(\*WRITE, \*READ, \*ERROR, 'command arg1 arg2' );while (<READ>) {waitpid ($pid, 0 );
这个例子将一个名为”command”的进程启动,并将其标准输出连接到$READ文件句柄。然后,它会从$READ读取标准输出的内容,并对其进行处理。最后,使用waitpid()等待该进程终止,以确保所有输出都已发送。
open3 函数顾名思义, 就是开启三个文件句柄. 其返回值为 pid.
将输出发送至两个文件句柄 使用 IO::Tee 模块.
其和 STDOUT 配合使用的示例:
1 2 3 4 5 6 use IO::Tee;open my $handle1, ">" , "/tmp/handle1" ;open my $handle2, ">" , "/tmp/handle2" ;my $tee = IO::Tee->new($handle1, \*STDOUT);print $tee "foo" , "bar" ;
注意这里要传递引用.
Data::Dumper 输出 utf8 1 2 use Data::Dumper;print Dumper($data) =~ s/\\x\{([0-9a-f]{2,})\}/chr hex $1/g er;
使输出文本加粗和加下化线等 加粗如:
1 print "\e[1mHello\e[0m\n" ;
加下划线如:
1 print "\e[4mHello\e[0m\n" ;
控制光标移动 使用 Term::ReadKey 模块.
如:
1 2 3 4 5 6 7 8 9 10 11 12 13 14 15 16 17 18 19 20 21 22 23 24 25 26 27 28 29 30 31 32 33 34 35 36 use Term::ReadKey;'cbreak' );while (1 ) {my $char = ReadKey(0 );if ($char eq "j" ) {print "\033[1B" ;elsif ($char eq "k" ) {print "\033[1A" ;elsif ($char eq "h" ) {print "\033[1D" ;elsif ($char eq "l" ) {print "\033[1C" ;elsif (ord ($char) == 27 ) {last ;'normal' );
去除字符串开头和结尾的空白字符 1 2 3 4 5 sub trim my $str = shift ;s/^\s+|\s+$//g ;return $str;
chr 和 ord 内置函数 chr (character) 函数, 用于将 ASCII 码转换为对应的字符.
ord (ordinal) 函数, 用于获取给定字符的 ASCII 编码值.
示例如:
1
2
3
4
5
my $character = chr (96 );print $character;my $ordinal = ord ("A" );print $ordinal;
若要获取一个 unicode 字符的编码值, 需要启用 use utf8;, 如:
1
2
3
4
use utf8;my $ordinal = ord ("界" );print $ordinal;
Perl 5 中的新函数定义语法 在 Perl 5 中引入的:
1
2
3
sub test ($test ) print $test;
的函数定义语法.
类似于 __DATA__ 的特殊标记
__DATA__: 标记程序中嵌入的数据,参考 perldoc perldata 中的 DATA and END sections。
__END__: 标记程序的结束位置,参考 perldoc perldata 中的 DATA and END sections。
__PACKAGE__: 获取当前程序的命名空间名称,参考 perldoc perlmod 中的 DECLARING A NAMESPACE。
__FILE__: 获取包含当前代码的文件名,参考 perldoc perlvar 中的 Predefined Variables。
__LINE__: 获取当前代码的行号,参考 perldoc perlvar 中的 Predefined Variables。
__SUB__: 获取当前子程序的引用,参考 perldoc perlsub 中的 Functions for Caller Control。
__WARN__: 用于自定义警告信息的处理,参考 perldoc perlvar 中的 Predefined Variables。
__PACKAGE__::function: 使用特定命名空间中的函数,参考 perldoc perlmod 中的 FULLY QUALIFIED NAMES FOR FUNCTIONS。
Perl 多线程 用 threads 模块.
JSON 模块处理 bless 问题 1 2 3 4 5 6 use Data::Dumper;use JSON -convert_blessed_universally;my $json = JSON->new->allow_nonref->convert_blessed;my $object = bless {foo => 'bar' }, 'Foo' ;print $json->encode($object);
C 文件加载出错 mismatched CursesBoot.c: loadable library and perl binaries are mismatched (got first handshake key 0xeb80080, needed 0xf380080)
重新安装:
1 2 perl -MCPAN -e shell install Curses