Curses 是系统库 curses 的 Perl 接口, 其用于对终端屏幕的处理.
Curses 模块 使用示例 1 2 3 4 5 6 7 8 9 10 11 12 13 14 15 16 17 18 19 20 21 22 23 24 25 26 27 28 29 30 31 32 33 34 35 36 37 38 39 40 41 42 43 44 45 46 47 48 49 50 51 52 53 54 55 56 57 58 59 60 61 62 63 64 65 66 67 use Curses;1 ); my $text = "This is a sample text.\n" ;my $max_y = getmaxy(curscr);my $max_x = getmaxx(curscr);my $y = 0 ;my $x = 0 ;while (1 ) {my $ch = getch();if ($ch eq 'q' ) {last ;elsif ($ch eq 'h' ) {if ($x > 0 ) {elsif ($ch eq 'j' ) {if ($y < $max_y - 1 ) {elsif ($ch eq 'k' ) {if ($y > 0 ) {elsif ($ch eq 'l' ) {if ($x < $max_x - 1 ) {elsif ($ch eq "\n" ) {my $output_text = inch(); 1 , $x);"\r$output_text" );
解释
initscr() (init screen 的缩写) 在初始化时会进行:
将终端从 cooked mode 切换到 cbreak 或 raw mode,以禁用行缓冲和回显。
隐藏光标。
清空屏幕并将光标移动到左上角。
初始化 Curses 数据结构。
启用特殊的键盘映射,如 F1 到 F12、方向键等。
这些操作会将屏幕清空并创建一个新的虚拟窗口,程序将在该虚拟窗口中运行。程序可以使用 Curses 库提供的函数在虚拟窗口中输出文本和图形,同时 Curses 库会自动管理虚拟窗口的光标位置,保证光标总是在可见范围内。
addstr() (add string 的缩写), 用于在 Curses 创建的新的虚拟窗口中输出文本 (不用 print).
下面两行:
1
2
my $max_y = getmaxy(curscr);my $max_x = getmaxx(curscr);
用于获取当前屏幕的宽度和长度. 其和 $LINES 和 $COLS 两个 Curses 中的全局变量等价.
move($y, $x) 用于移动光标, $y 和 $x 分别是目的坐标.
my $ch = getch() 用于从 STDIN 获取一个字符的输入.
getyx(curscr, $cursor_y, $cursor_x) 用于获取当前光标位置, 返回的值存放在 $cursor_y 和 $cursor_x 中, curscr 是一个特殊的变量,表示当前屏幕窗口的引用, 其保存了屏幕上的所有字符以及它们的属性.
使用 addstr() 输出字符串后, 需要 refresh() 才能显示出来.
instr($str) 函数获取窗口中指定位置的字符串,并将其存储到 $str 变量中.
启用颜色 用 start_color() 子例程启用彩色模式.
调用此子例程后,你可以使用init_pair()来定义颜色对.
然后在使用attron()和attroff()时使用它们来改变文本的颜色。
示例:
1
2
3
4
5
6
7
8
9
10
11
12
13
use Curses;1 , COLOR_RED, COLOR_BLACK);10 , 0 ); 1 ));"这一行背景颜色将变成红色" );1 ));
init_pair() 有三个参数:
第一个参数, 分配数字作为标号
第二个参数, 定义前景色
第三个参数, 定义后景色
attron() 函数用于开启颜色模式,并将它的参数指定的颜色对应用到后续输出的文本中。
attroff() 函数用于关闭颜色模式,确保后续文本使用正确的颜色
bkgd() 可以设置屏幕背景颜色.
绘制边框 注意在输出文本后重新绘制边框, 示例如:
1
2
3
4
5
6
7
8
9
10
11
12
13
14
15
16
17
18
19
20
21
22
23
24
25
26
27
28
29
use Curses;my $win = newwin($LINES, $COLS, 0 , 0 );1 );0 ,0 );while (1 ) {my $ch = getch();if ($ch eq 'g' ) {0 ,0 );" Line 1\n" );" Line 2\n" );" Line 3\n" );" Line 4\n" );" Line 5\n" );" Line 6\n" );" Line 7\n" );" Line 8\n" );" Line 9\n" );" Line 10\n" );0 ,0 );
创建多个 windows 对于 wgetch, 直接使用时会报错, 这类函数都可以直接用 getch, 如:
1
2
my $win = newwin(0 ,0 ,0 ,0 );
这样就同样是在 $win 中获取一个字符.
window:window 是表示屏幕上区域的基本对象。你可以使用 Curses 提供的一系列函数来操作窗口,例如输出文本、更改文本颜色、移动光标等。窗口支持分页和滚动,并可以用于在一个屏幕上显示多个子窗口。
pad:pad 与 window 类似,但它不直接显示在屏幕上。相反,pad 是一个虚拟窗口,可以用于处理大量数据而无需担心数据是否能够放入显示区域。你可以在实际窗口上使用 pad 作为背景,并对其进行垂直和水平滑动以及裁剪。
panel:panel 是一个可视化区域,它可以被移动、隐藏或变换大小,并且可以具有 Z 轴深度。你可以通过创建多个 panel 并按指定顺序排列它们,从而创建复杂的用户界面。panel 相对于文本输入和输出的位置移动,因此它适合需要多个层次或覆盖视图的用户界面。
menu:menu 是用于创建菜单的对象,它可以在窗口或 pad 内部显示列表并响应用户选项。它支持多种类型的菜单,包括单选、多选和上下文菜单。
隐藏光标 使用 curs_set 来设置, 其接受一个整数, 如:
0 表示隐藏光标。
1 表示显示光标。
2 表示将光标设置为高亮状态(不是所有的终端都支持)。
Curses::UI 模块 创建对象时可设置选项, 如:
1
2
3
4
5
use Curses::UI;my $cui = Curses::UI->new( -clear_on_exit => 1 ,-debug => $debug, );
通过 mainloop 开始主循环, 在开始循环之前设定好其他数据.
可用 mainloopExit() 来退出主循环.
基类 Curses::UI::Widget 是 Curses::UI 中定义的一个基本抽象类,它是所有控件的基础, 其用于 开发自己的控件类 , 也就是说, 继承自 Curses::UI::Widget:
1 2 3 4 5 6 package MyWidget;use strict;use warnings;use base qw(Curses::UI::Widget) ;
Container 其继承于 Curses::UI::Widget, 用于将多个 widgets 放在一个 “form” 之中.
利用 add 方法来添加 widget 到 container 中, 其用法为:
1 add ( ID, CLASS, OPTIONS )
如:
1 2 3 4 5 6 7 $container->add('myid' , 'Label' , -text => 'Hello, world!' , -x => 10 ,-y => 5 ,
add 方法会自动调用 use Class; 来加载模块. Lable 默认为 Curses::UI::Lable 模块.
可从容器中删除一个 widget, 用 delete 方法:
模块的示例代码为:
1 2 3 4 5 6 7 8 9 10 11 12 13 14 use Curses::UI;my $cui = new Curses::UI;my $win = $cui->add('window_id' , 'Window' );my $container = $win->add('mycontainer' , 'Container' 'contained' , 'SomeWidget' ,
Color 和颜色设置相关, 可用 perldoc Curses::UI::Color 查看.
1 2 3 4 5 6 my $cui = new Curses::UI(-color_support => 1 , -clear_on_exit => 0 );my $mainw = $cui->add('screen' , 'Window' );'l' ,'Label' , -bg => "white" , -fg => "blue" , -text => "Colored Label" );
这里启用 -color_support 选项可以用更多颜色.
Common 其也用于创建自己的 widget, 这个模块中定义了许多 Curses::UI 系列模块中的通用方法, 使用如:
1 2 3 4 5 package MyPackage;use Curses::UI::Common;use vars qw(@ISA) ;qw(Curses::UI::Common) ;
Searchable 其提供类似 less pager 的功能.
此处都继承自 Curses::UI::Widget
每一个 widget 都有一些特有的 method.
Window 其用于创建 window.
获得一个 window:
1 2 3 4 5 6 use Curses::UI;my $cui = new Curses::UI;my $win = $cui->add('window_id' , 'Window' ,
这里 $cui->add() 应该是先创建了一个 container, 然后返回给 $win, 同时也将这个 window 添加到 $cui 中.
另一个示例:
1 2 3 4 5 6 7 8 9 10 11 12 13 14 15 16 17 use Curses::UI;my $cui = new Curses::UI(-clear_on_exit => 1 ); my $win = $cui->add('window_id' , 'Window' , -border => 1 , -title => 'My Window' );my $label = $win->add('label_id' , 'Label' , -text => 'Hello World!' , -x => 2 , '-y' => 2 );sub exit }, "\cQ" );
注意, 在 Curses::UI 应用程序中,按 Ctrl+C 或 Ctrl+D 是无法正常退出的, 这里绑定用 Ctrl+Q 退出.
在 Curses::UI 中,focus() 子例程将使当前窗口获取输入焦点。当一个窗口被聚焦时,用户在键盘上输入的所有字符都会被发送到该窗口,而非发送到其他窗口。
具体来说,当一个窗口被调用 focus() 子例程时,它将成为当前活动窗口。此时,Curses::UI 应用程序将只响应该窗口中定义的键绑定和事件处理程序。这使得用户能够与特定窗口进行交互而不影响其他窗口的操作。
在上面的示例代码中,我们使用了 $win->focus() 将窗口 $win 设为当前聚焦窗口,这意味着任何用户的输入都将发送到该窗口,而不是任何其他窗口。
总之,focus() 子例程的作用是确保当前窗口能够正常地接收到用户的输入,同时将其他窗口的操作和键盘事件排除在外。
上述代码的效果:
-border 选项用于开启边缘线 (像 Curses 中的 box(0,0))
Bottonbox 用于创建按钮, 如在 window 上添加按钮:
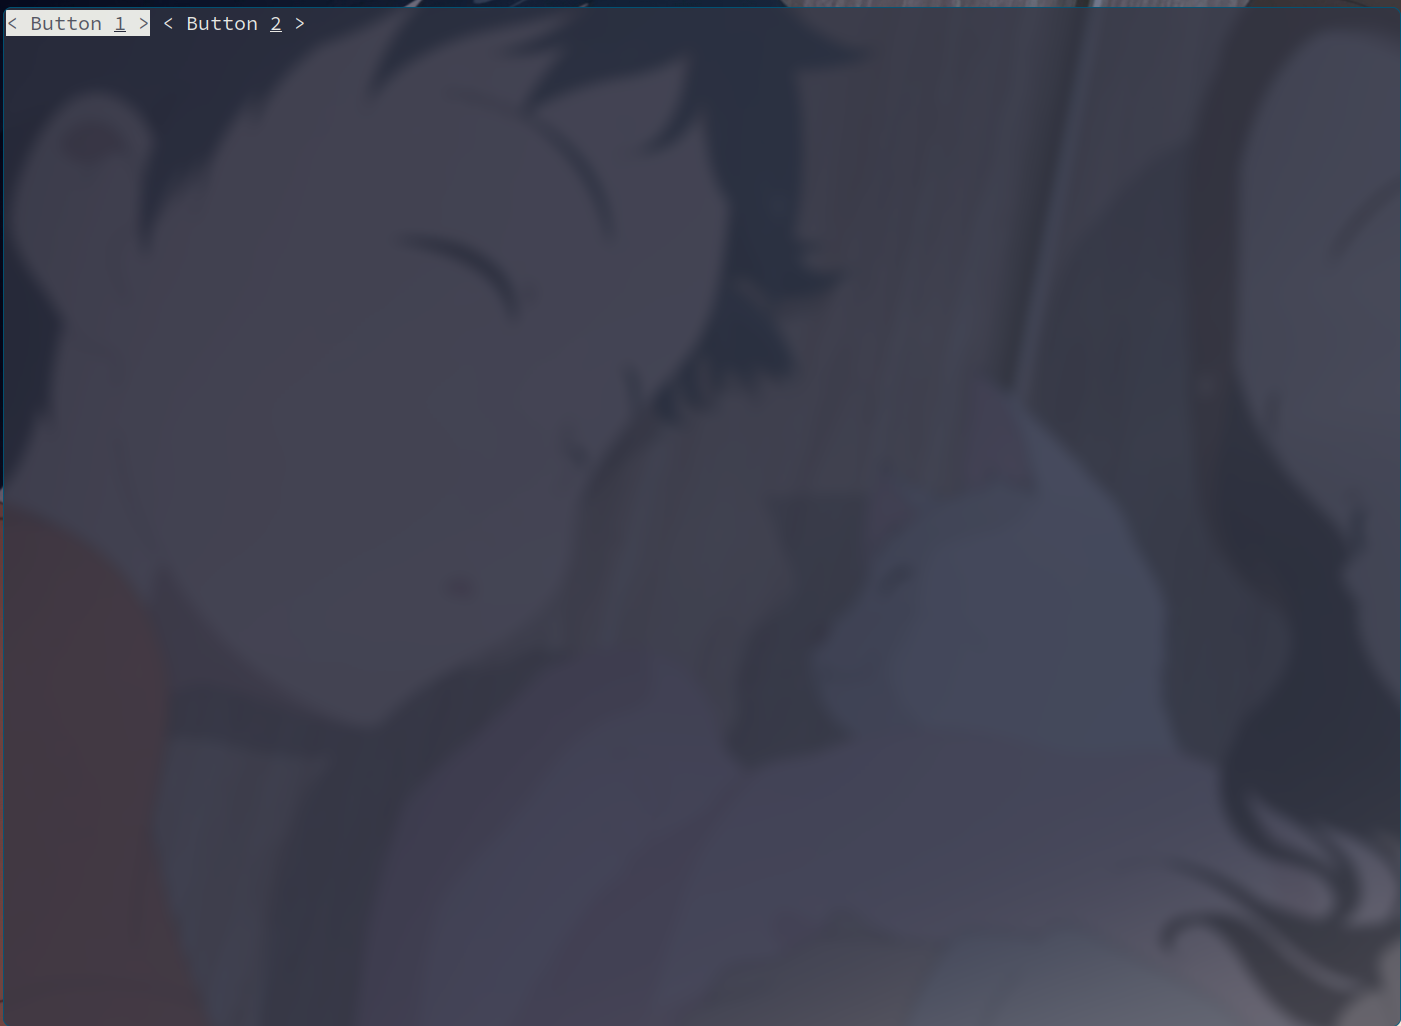
1 2 3 4 5 6 7 8 9 10 11 12 13 14 15 16 17 18 19 20 21 22 23 24 25 26 27 use Curses::UI;my $cui = new Curses::UI;my $win = $cui->add('window_id' , 'Window' );my $buttons = $win->add('mybuttons' , 'Buttonbox' ,-buttons => [-label => '< Button 1 >' ,-value => 1 ,-shortcut => 1 -label => '< Button 2 >' ,-value => 2 ,-shortcut => 2 my $value = $buttons->get();sub exit }, "\cQ" );
效果如:
同样 my $buttons = $win->add() 返回一个对象.
-lable 设置的是 botton 显示的内容.
-value 设置 $bottons->get() 的返回值.
-shortcut 设置跳转的按键, 比如这里按 1 跳到 botton 1 上.
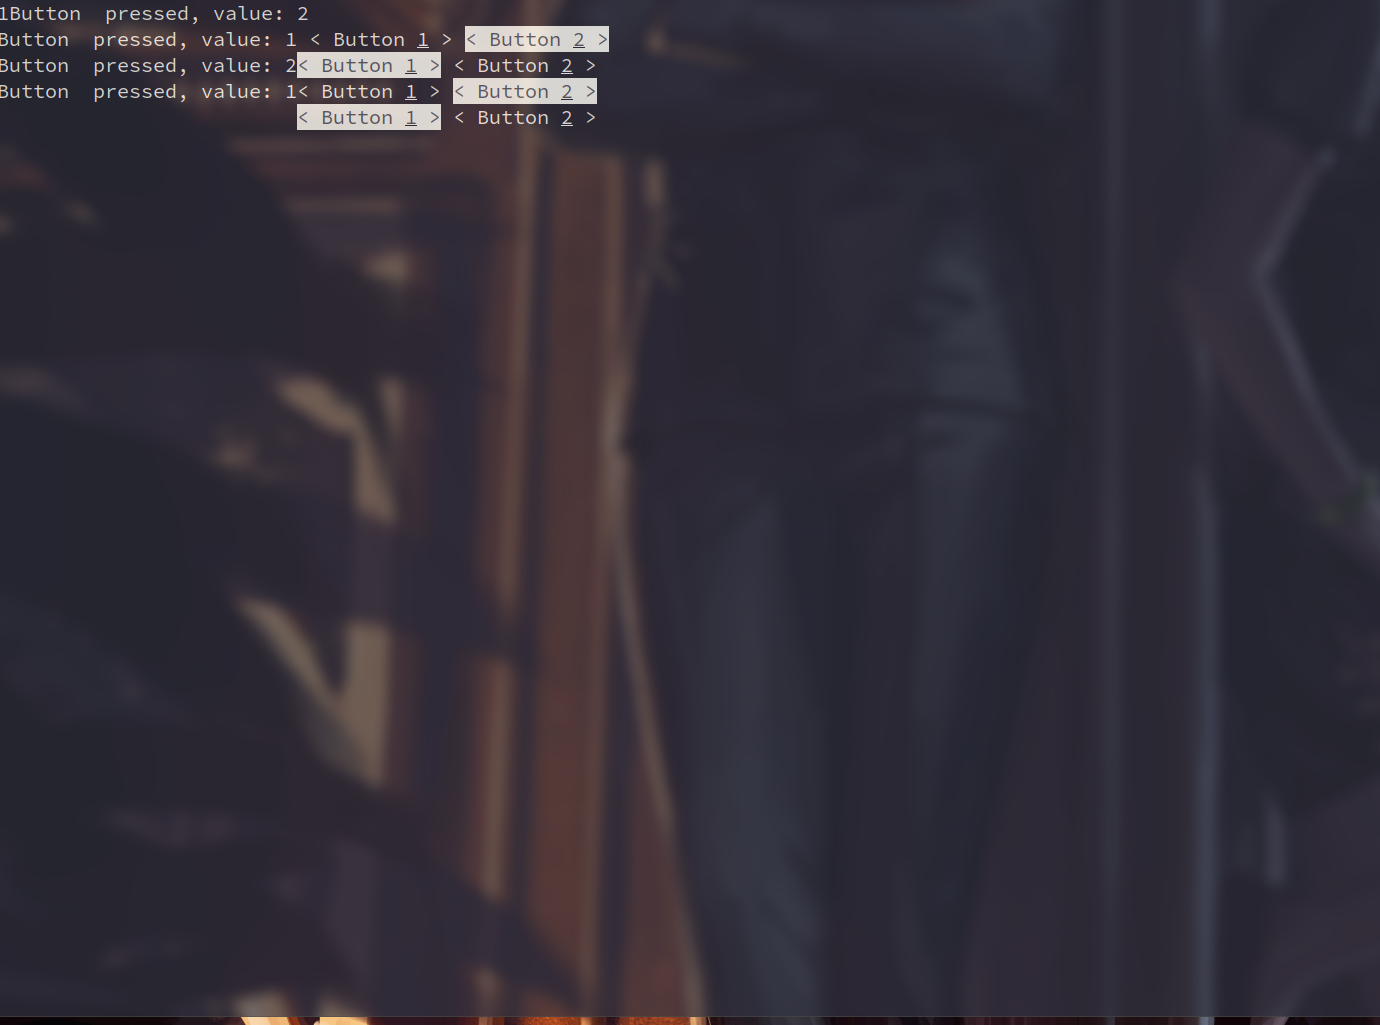
-shortcut 设置的键可用于触发 -onpress 后设置的处理程序, 如:
1 2 3 4 5 6 7 8 9 10 11 12 13 14 15 16 17 18 19 20 21 22 23 24 25 26 27 28 29 30 31 32 33 34 35 36 use Curses::UI;my $cui = new Curses::UI;my $win = $cui->add('window_id' , 'Window' );my $buttons = $win->add('mybuttons' , 'Buttonbox' ,-buttons => [-label => '< Button 1 >' ,-value => 1 ,-shortcut => 1 ,-onpress => \&button_press_handler -label => '< Button 2 >' ,-value => 2 ,-shortcut => 2 , -onpress => \&button_press_handler my $value = $buttons->get();print $value;sub exit }, "\cQ" );sub button_press_handler my ($self, $button) = @_;my $value = $self->get(); print "Button $button pressed, value: $value\n" ;
效果如:
默认可以用 h, l, <UP>, <DOWN>, <TAB> 等来移动选中的按钮, 但触发 -onpress 还是 -shortcut 来设置.
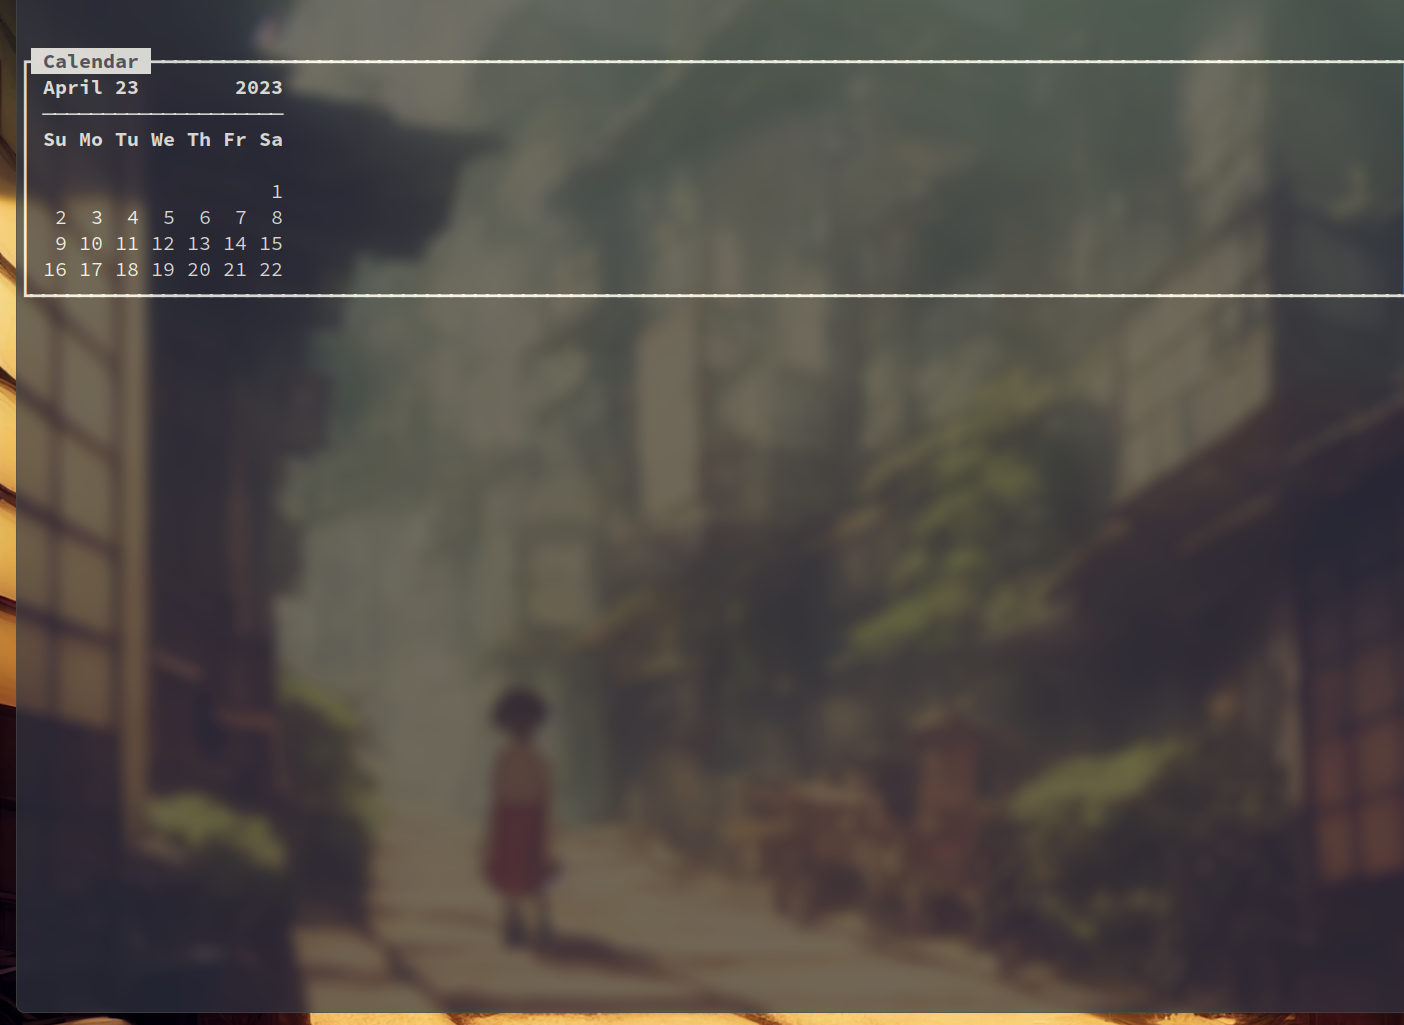
Calendar 其可用于创建一个日历窗口, 如:
1 2 3 4 5 6 7 8 9 10 11 12 13 14 15 16 17 18 19 20 21 22 23 24 25 26 27 use Curses::UI;my $cui = Curses::UI->new();my $cal_win = $cui->add('calendar' , 'Window' ,-title => 'Calendar' ,-border => 1 ,-height => 10 ,'-y' => 2 ,my $calendar = $cal_win->add('calendar' , 'Calendar' ,-width => 22 ,-height => 7 ,-onchange => \&onchange_handler,sub exit (0 ); }, "\cQ" );sub onchange_handler my ($self) = @_;my $date = $self->get();print "Selected date is: $date\n" ;
效果如:
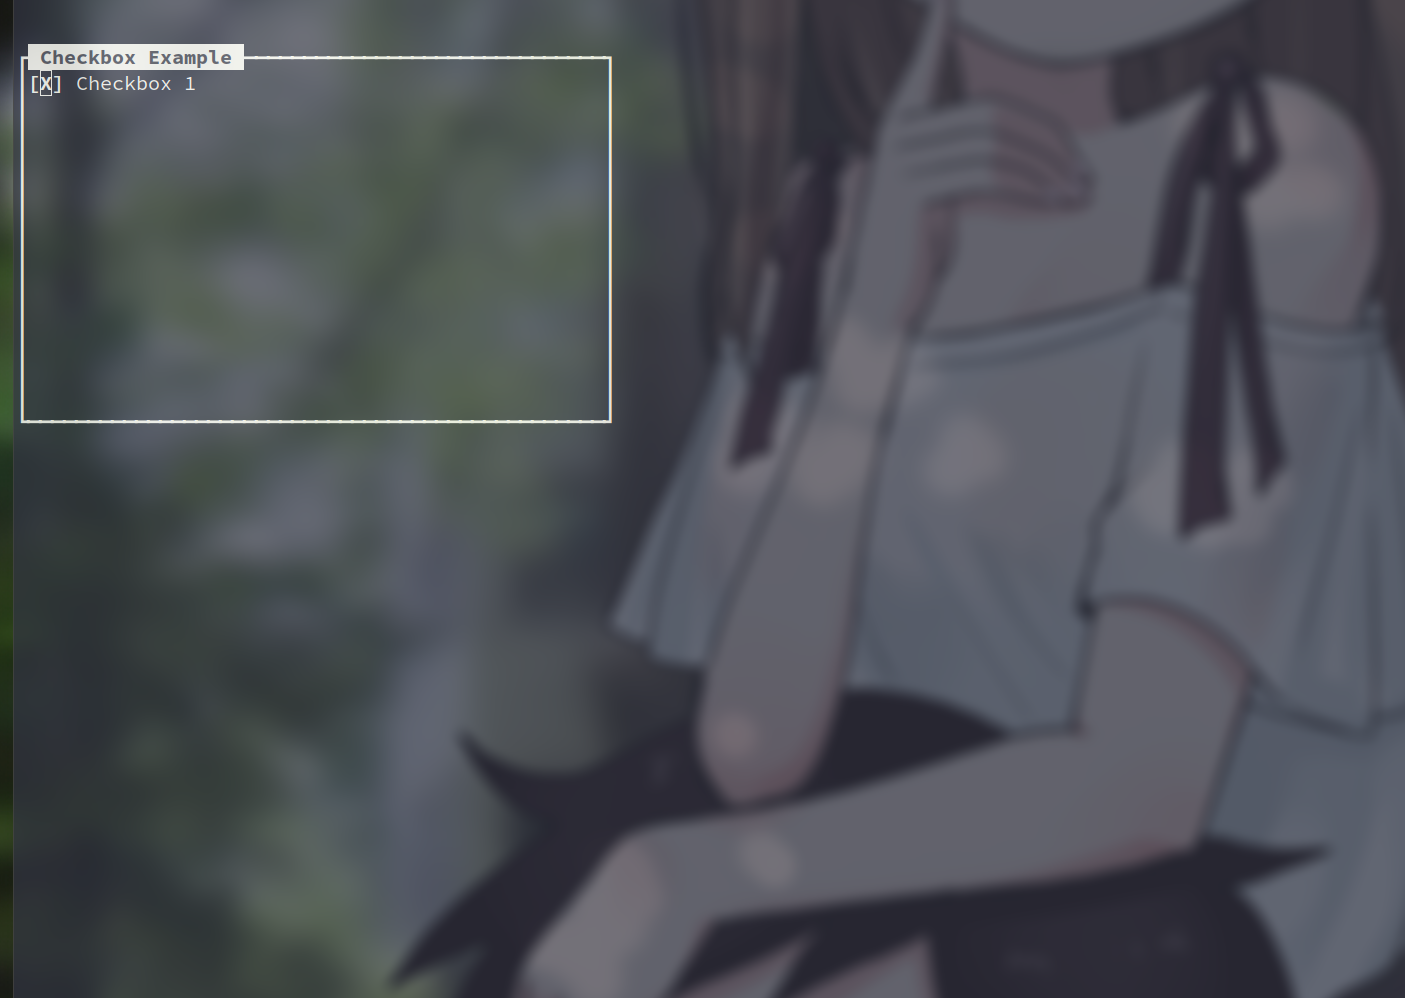
Checkbox 其用于创建复选框.
示例如:
1 2 3 4 5 6 7 8 9 10 11 12 13 14 15 16 17 18 19 20 21 22 23 24 25 26 27 28 29 30 31 32 33 34 35 36 use Curses::UI;my $cui = new Curses::UI;my $win = $cui->add('win' , 'Window' ,-title => 'Checkbox Example' ,-border => 1 ,-height => 15 ,-width => 50 ,-y => 2 ,my $box1 = $win->add('box1' , 'Checkbox' ,-label => 'Checkbox 1' ,-checked => 1 ,-onchange => \&onchange_handler,my $box2 = $win->add('box2' , 'Checkbox' ,-label => 'Checkbox 2' ,-checked => 0 ,-onchange => \&onchange_handler,sub exit (0 ); }, "\cQ" );sub onchange_handler my ($self) = @_;my $state = $self->get();print "label is now " . ($state ? "checked" : "unchecked" ) . "\n" ;
效果如:
box1 和 box2 是 Checkbox 的名称.
-lable 是复选框内容.
-checked 是初始状态.
-onchange 是状态改变后执行的操作.
默认是 <TAB> 在多个 box 之间切换. 可以通过 focus_next() 和 focus_prev() 两个方法来操作.
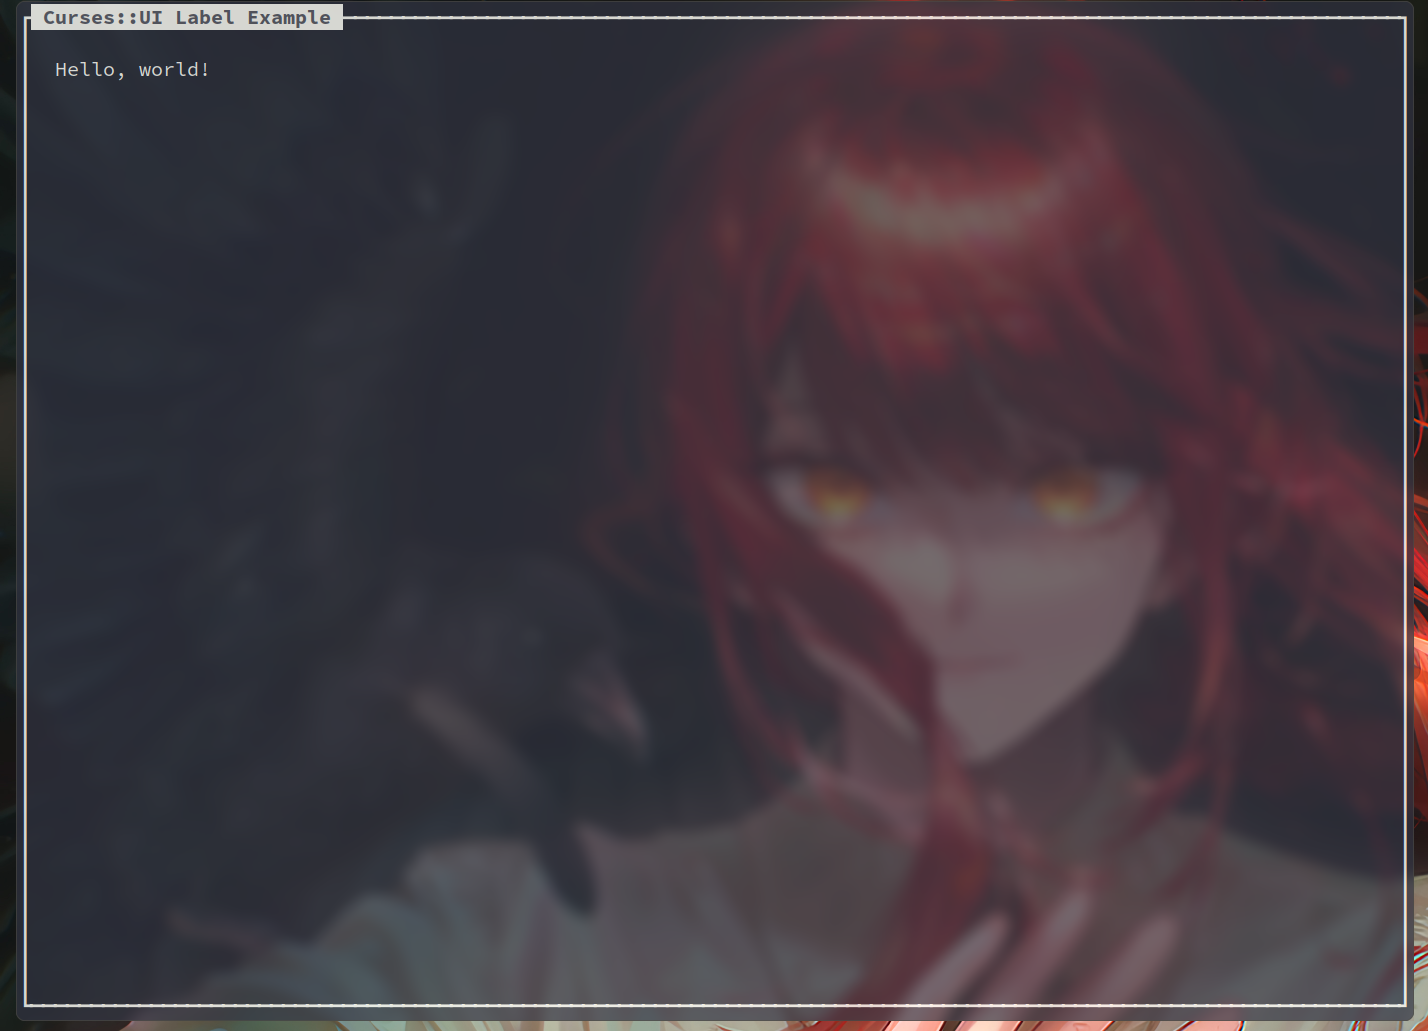
Label 其是 Curses::UI 中用于显示文本的控件。它可以用来显示简单的文本或带格式的富文本,支持多种字体和颜色,是开发基于 Curses::UI 的终端应用程序中非常有用的工具之一。
如用来显示一条 textstring, 这个 textstring 可以为:
bold
dimmed
reverse
underlined
blinking
示例代码:
1 2 3 4 5 6 7 8 9 10 11 12 13 14 15 16 17 18 19 use Curses::UI;my $cui = Curses::UI->new();my $win = $cui->add('win' , 'Window' ,-border => 1 ,-title => 'Curses::UI Label Example' my $label = $win->add('label' , 'Label' ,-text => "Hello, world!" ,-width => 20 ,-height => 3 ,-x => 2 ,'-y' => 1 ,sub "\cQ" );
效果如:
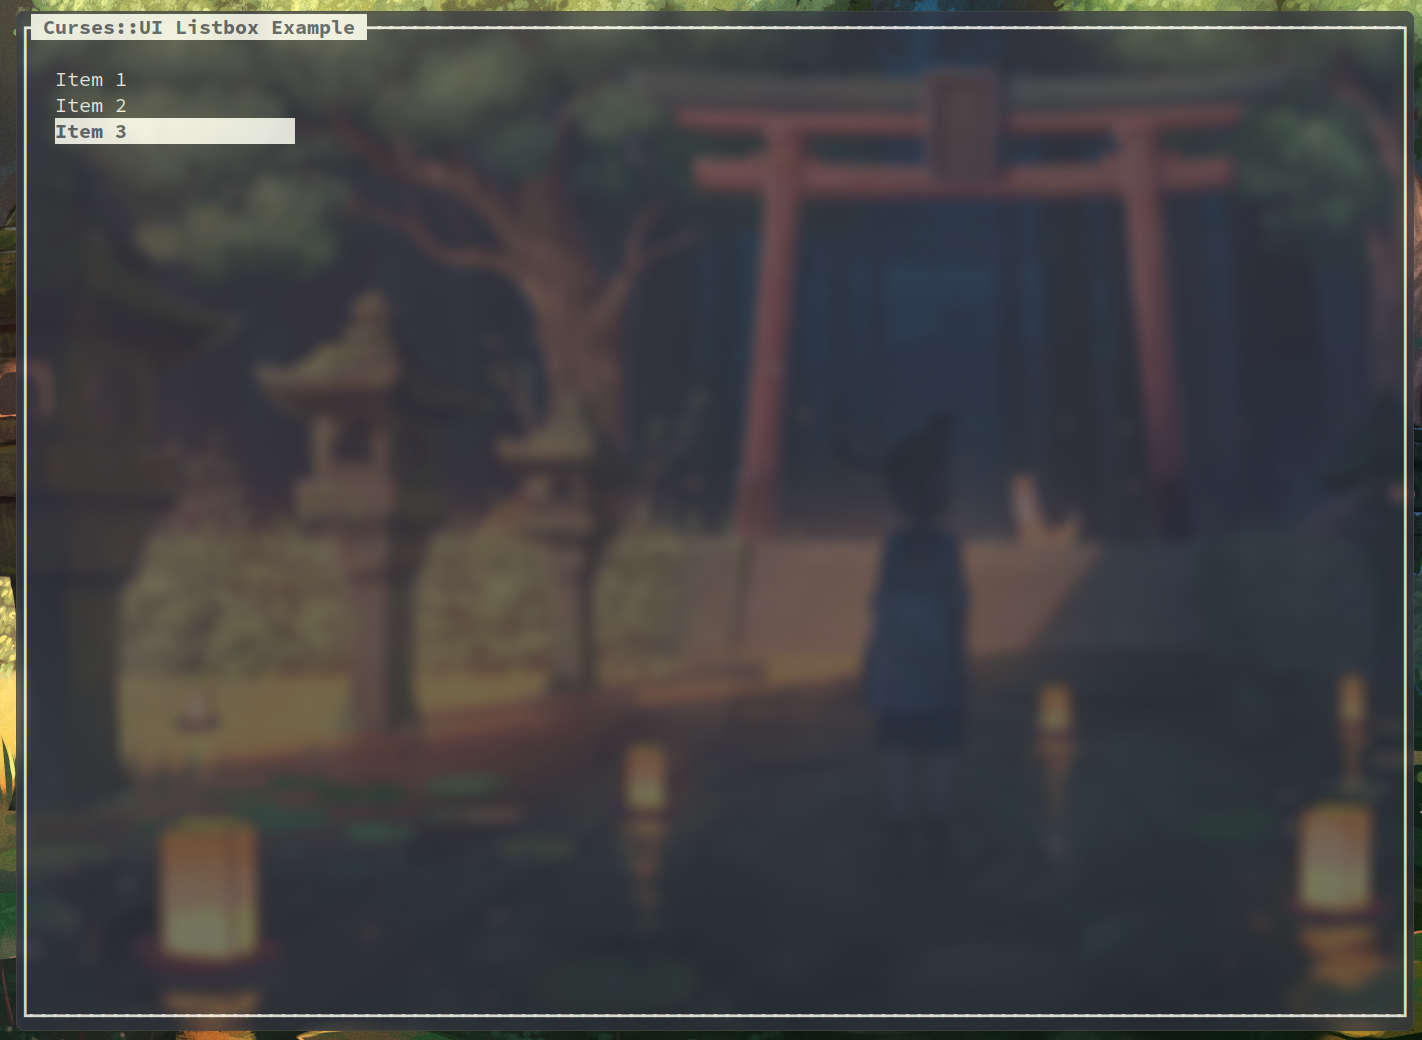
Listbox Curses::UI::Listbox 是 Curses::UI 中用于显示列表的控件。它可以用来显示简单的文本列表,支持多选和单选模式.
示例代码如:
1
2
3
4
5
6
7
8
9
10
11
12
13
14
15
16
17
18
19
20
21
22
23
24
25
26
27
use Curses::UI;my $cui = Curses::UI->new();my $win = $cui->add('win' , 'Window' ,-border => 1 ,-title => 'Curses::UI Listbox Example' my @items = ('Item 1' , 'Item 2' , 'Item 3' );my $listbox = $win->add('listbox' , 'Listbox' ,-values => \@items,-height => scalar (@items) + 2 ,-width => 20 ,-x => 2 ,'-y' => 1 ,-onchange => \&on_listbox_changesub "\cQ" );sub on_listbox_change my ($self) = @_;my @selected = $self->get;print "Selected items: " , join (", " , @selected), "\n" ;
被选中的会高亮显示.
效果如:
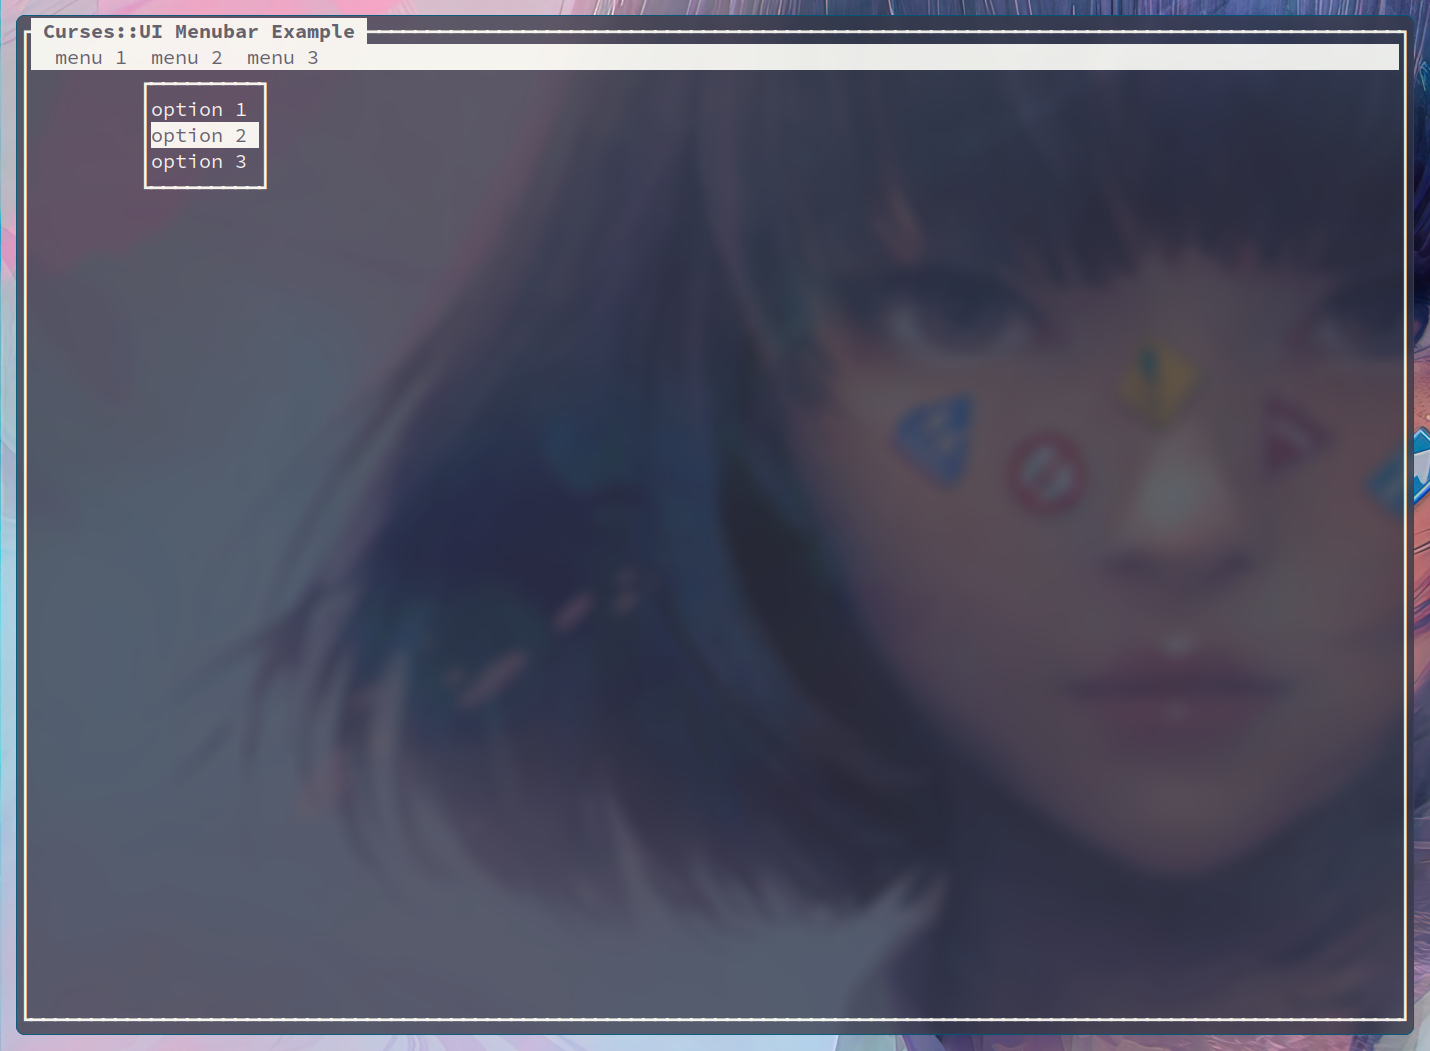
Curses::UI::Menubar 是 Curses::UI 中用于显示菜单栏的控件。它可以用来实现终端应用程序中的菜单功能,支持多级子菜单和快捷键等特性.
示例代码如:
1 2 3 4 5 6 7 8 9 10 11 12 13 14 15 16 17 18 19 20 21 22 23 24 25 26 27 28 29 30 31 32 33 34 35 36 37 38 39 40 41 42 43 44 45 use Curses::UI;my $cui = Curses::UI->new();my $win = $cui->add('win' , 'Window' ,-border => 1 ,-title => 'Curses::UI Menubar Example' my $menu1 = [-label => 'option 1' , -value => '1-1' },-label => 'option 2' , -value => '1-2' },-label => 'option 3' , -value => '1-3' },my $menu2 = [-label => 'option 1' , -value => \&sel1 },-label => 'option 2' , -value => \&sel2 },-label => 'option 3' , -value => \&sel3 },my $submenu = [-label => 'suboption 1' , -value => '3-3-1' },-label => 'suboption 2' , -callback=> \&do_it },my $menu3 = [-label => 'option 1' , -value => \&sel2 },-label => 'option 2' , -value => \&sel3 },-label => 'submenu 1' , -submenu => $submenu },my $menu = [-label => 'menu 1' , -submenu => $menu1 },-label => 'menu 2' , -submenu => $menu2 },-label => 'menu 3' , -submenu => $menu3 }my $menubar = $win->add('menubar' , 'Menubar' ,-menu => $menusub exit ; }, "\cQ" );
效果如:
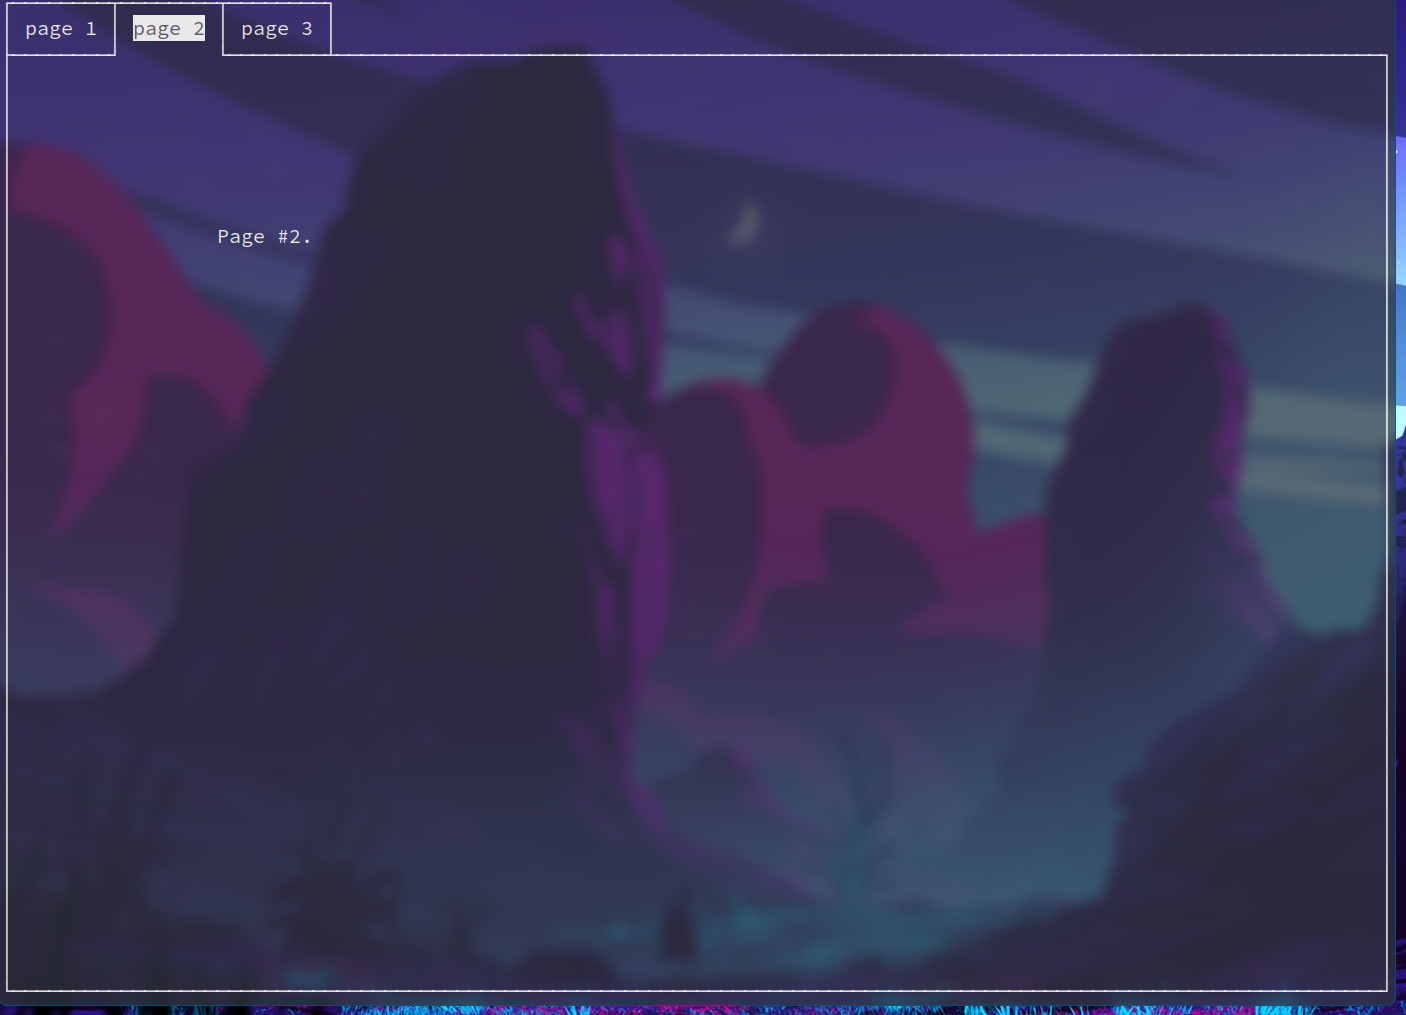
Notebook Curses::UI::Notebook 是 Curses::UI 中用于显示选项卡的控件。它可以用来实现终端应用程序中的多标签界面,每个标签页都可以包含不同的子部件.
示例代码如:
1 2 3 4 5 6 7 8 9 10 11 12 13 14 15 16 17 18 19 20 21 22 23 24 25 26 27 28 use Curses::UI;my $cui = new Curses::UI;my $win = $cui->add(undef , 'Window' );my $notebook = $win->add(undef , 'Notebook' );my $page1 = $notebook->add_page('page 1' );undef , 'Label' ,-x => 15 ,'-y' => 6 ,-text => "Page #1." ,my $page2 = $notebook->add_page('page 2' );undef , 'Label' ,-x => 15 ,'-y' => 6 ,-text => "Page #2." ,my $page3 = $notebook->add_page('page 3' , -on_activate => \&sub )undef , 'Label' ,-x => 15 ,'-y' => 6 ,-text => "Page #3." ,
翻页等功能可以看 perldoc.
效果如:
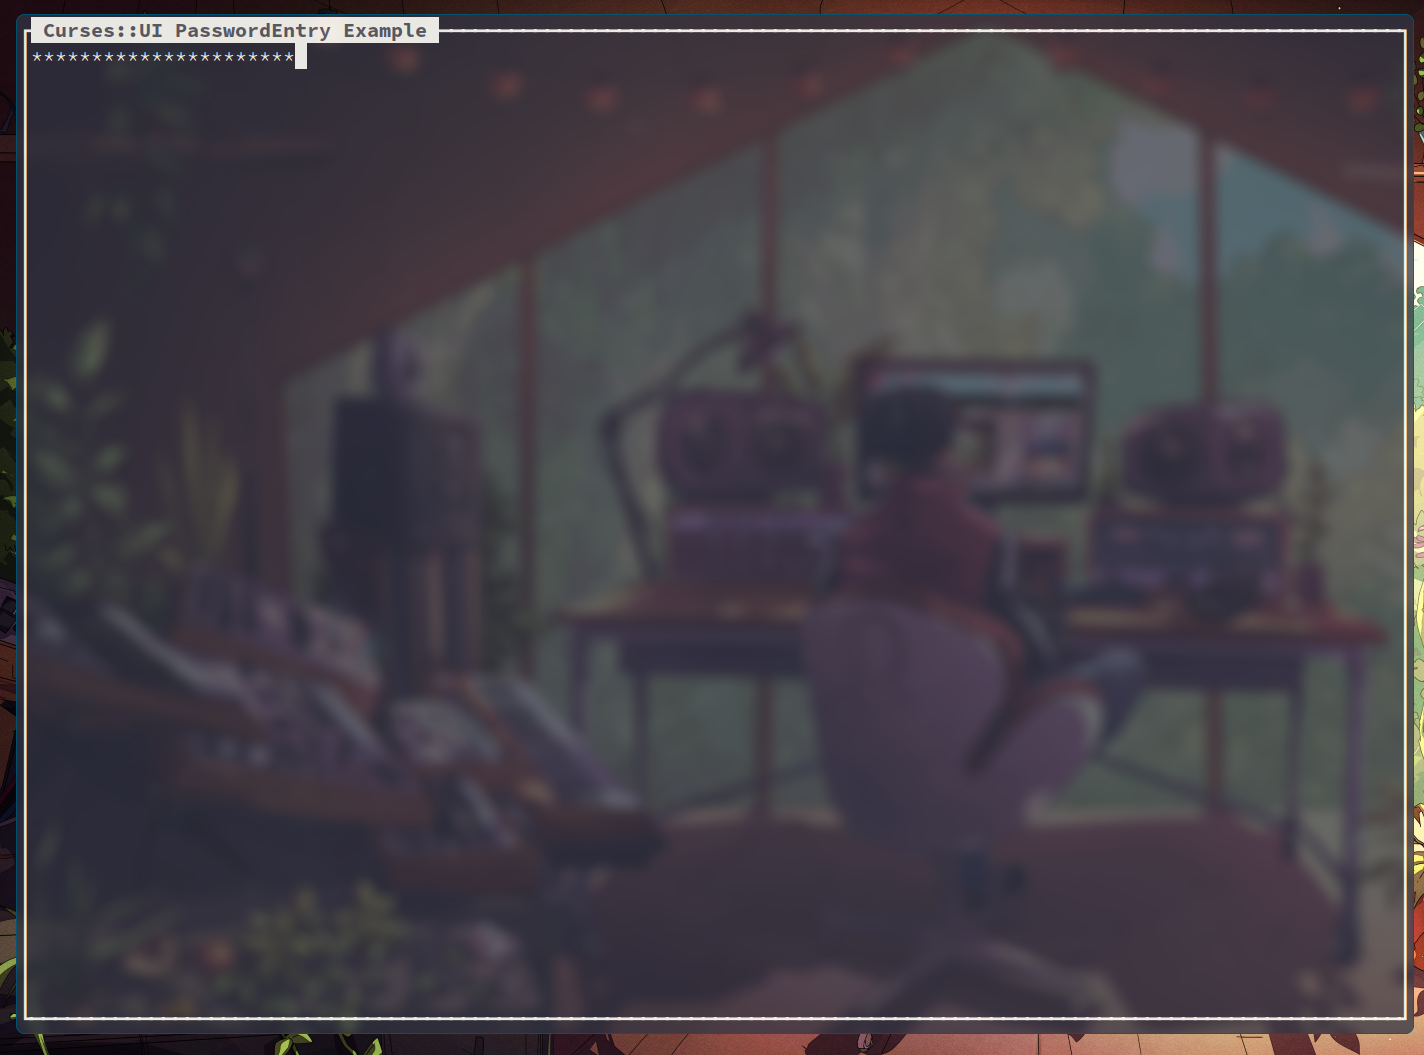
PasswordEntry Curses::UI::PasswordEntry 是 Curses::UI 中用于输入密码的控件。它与 TextEntry 控件类似,但在输入时会隐藏输入内容,以保护用户的隐私安全.
示例代码:
1 2 3 4 5 6 7 8 9 10 11 12 13 14 15 16 17 18 19 20 21 22 23 24 25 26 27 28 29 30 31 use Curses::UI;my $cui = Curses::UI->new();my $win = $cui->add('win' , 'Window' ,-border => 1 ,-title => 'Curses::UI PasswordEntry Example' my $pass = $win->add('pass' , 'PasswordEntry' ,-label => 'Password:' ,-password_char => '*' ,my $button = $win->add('button' , 'Buttonbox' ,-buttons => [-label => 'OK' ,-onpress => sub print "Password: " , $pass->get(), "\n" ;},-label => 'Cancel' ,-onpress => sub sub exit ; }, "\cQ" );
效果如:
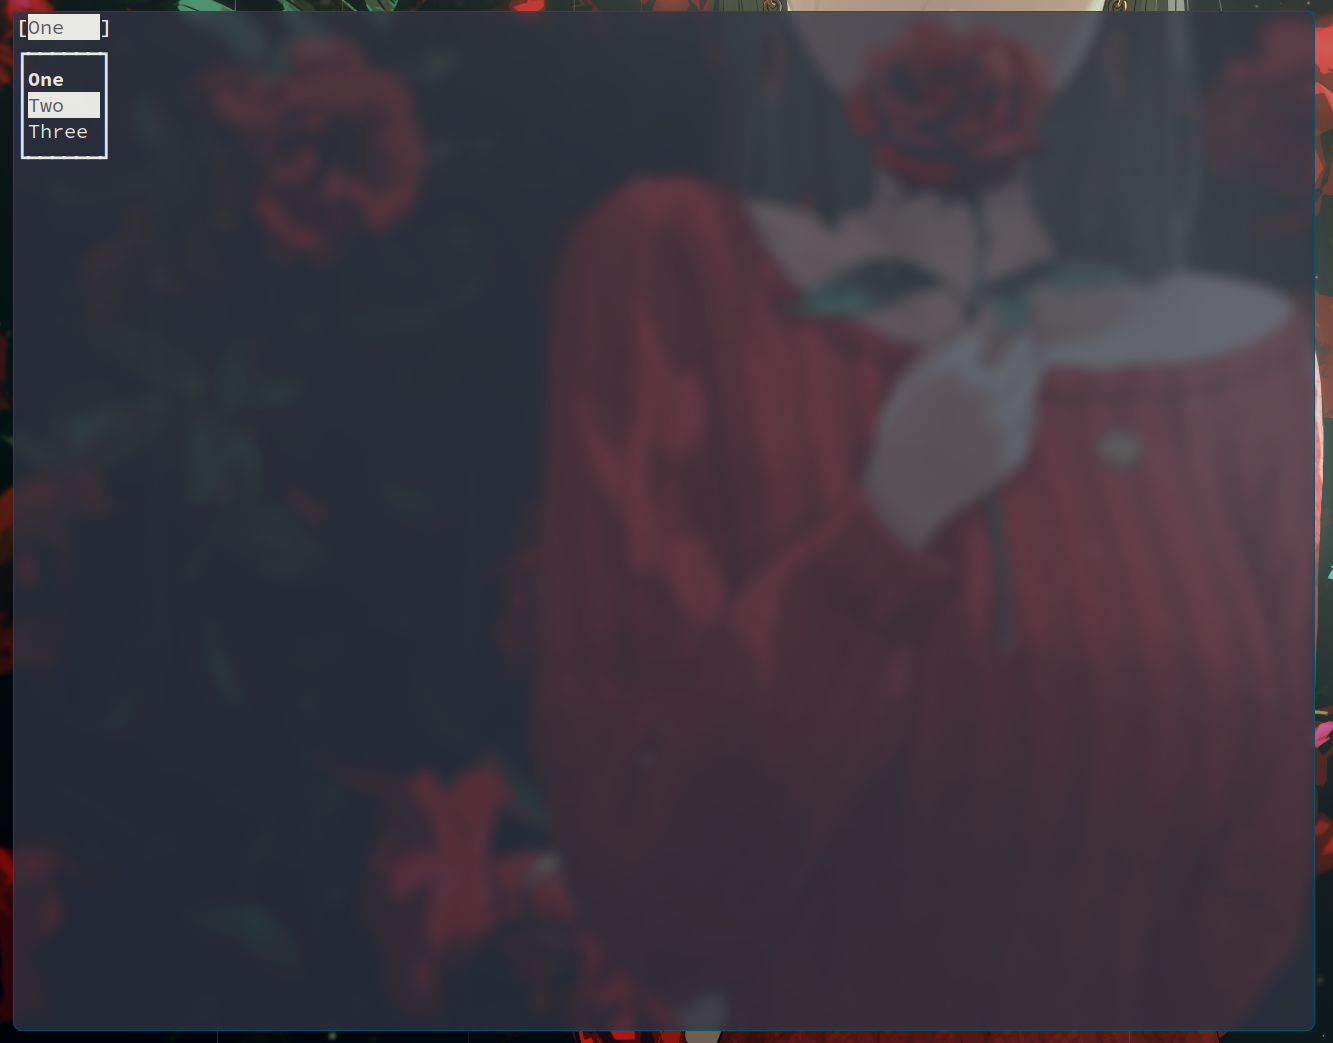
Curses::UI::Popupmenu 是 Curses::UI 中用于显示下拉菜单的控件。它通常与 Buttonbox 控件结合使用,用于实现下拉菜单选择功能.
示例代码如:
1
2
3
4
5
6
7
8
9
10
11
12
13
14
use Curses::UI;my $cui = new Curses::UI;my $win = $cui->add('window_id' , 'Window' );my $popupbox = $win->add('mypopupbox' , 'Popupmenu' ,-values => [1 , 2 , 3 ],-labels => { 1 => 'One' , 2 => 'Two' , 3 => 'Three' },my $value = $popupbox->get();
效果如:
Progressbar 显示程序的进度信息, 它可以显示任务的完成情况,让用户能够清楚地了解任务的进展。
示例代码:
1
2
3
4
5
6
7
8
9
10
11
12
13
14
15
use Curses::UI;my $cui = new Curses::UI;my $win = $cui->add('window_id' , 'Window' );my $progressbar = $win->add('myprogressbar' , 'Progressbar' ,-max => 250 ,-pos => 42 ,sub exit ; }, "\cQ" );
效果为:
Curses::UI::Radiobuttonbox 是 Curses::UI 中用于显示单选框的控件。它通常与 Buttonbox 控件结合使用,用于实现单选功能.
示例代码如:
1
2
3
4
5
6
7
8
9
10
11
12
13
14
15
16
17
18
use Curses::UI;my $cui = new Curses::UI;my $win = $cui->add('window_id' , 'Window' );my $radiobuttonbox = $win->add('myradiobuttonbox' , 'Radiobuttonbox' ,-values => [1 , 2 , 3 ],-labels => { 1 => 'One' , 2 => 'Two' , 3 => 'Three' },my $selected = $radiobuttonbox->get();sub exit ; }, "\cQ" );
效果如:
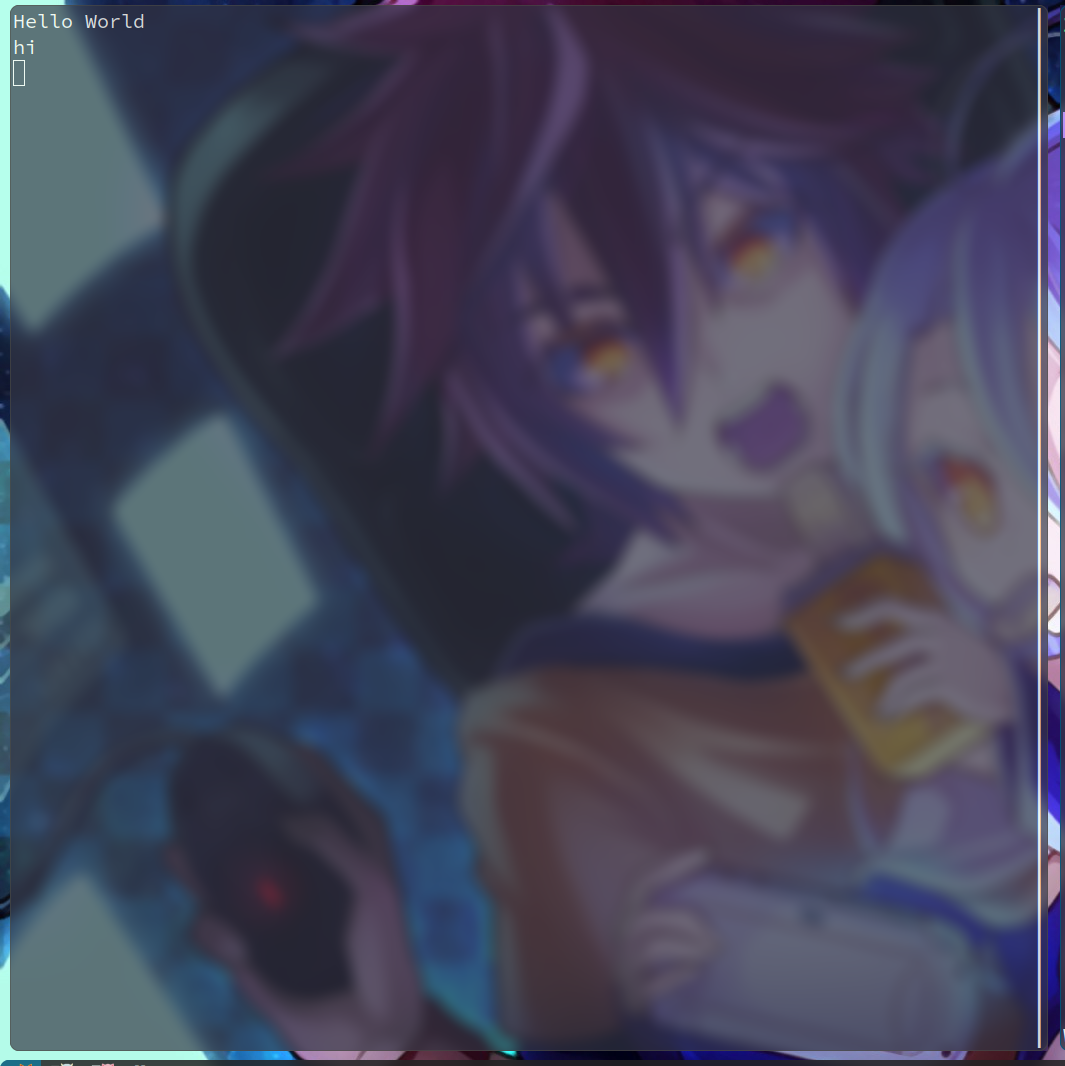
TextEditor 其可用于创建多种文本编辑器,包括多行和单行的文本编辑器。每种编辑器都有自己的一些特点,比如多行编辑器支持自动换行、最大文本长度和撤销等功能。
示例代码如:
1
2
3
4
5
6
7
8
9
10
11
12
13
14
15
16
use Curses::UI;my $cui = new Curses::UI;my $win = $cui->add('window_id' , 'Window' );my $editor = $win->add('myeditor' , 'TextEditor' ,-vscrollbar => 1 ,-wrapping => 1 ,my $text = $editor->get();print $text;sub print $editor->get(); exit (0 ) }, "\cQ" );
效果如:
$editor->get() 返回编辑器中的内容.
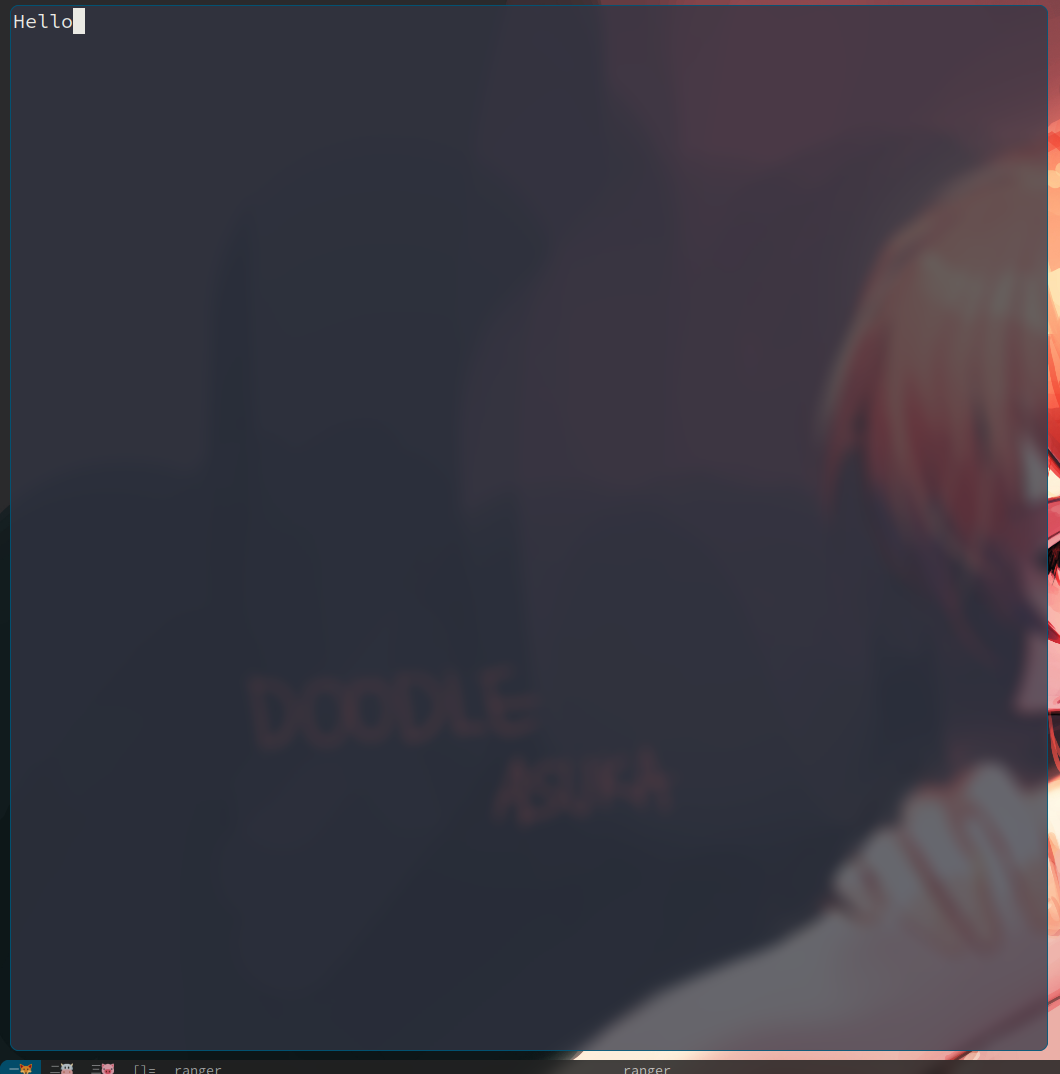
TextEntry 其用于创建文本输入框的小部件,继承自 Curses::UI::TextEditor 类。唯一不同的是,-singleline 选项被强制设置为 true 值,因此其使用与 Curses::UI::TextEditor 相同。
示例代码如:
1
2
3
4
5
6
7
8
9
10
11
12
13
use Curses::UI;my $cui = Curses::UI->new();my $win = $cui->add('window_id' , 'Window' );my $textentry = $win->add('mytextentry' , 'TextEntry' my $text = $textentry->get();sub print $editor->get(); exit (0 ) }, "\cQ" );
效果如:
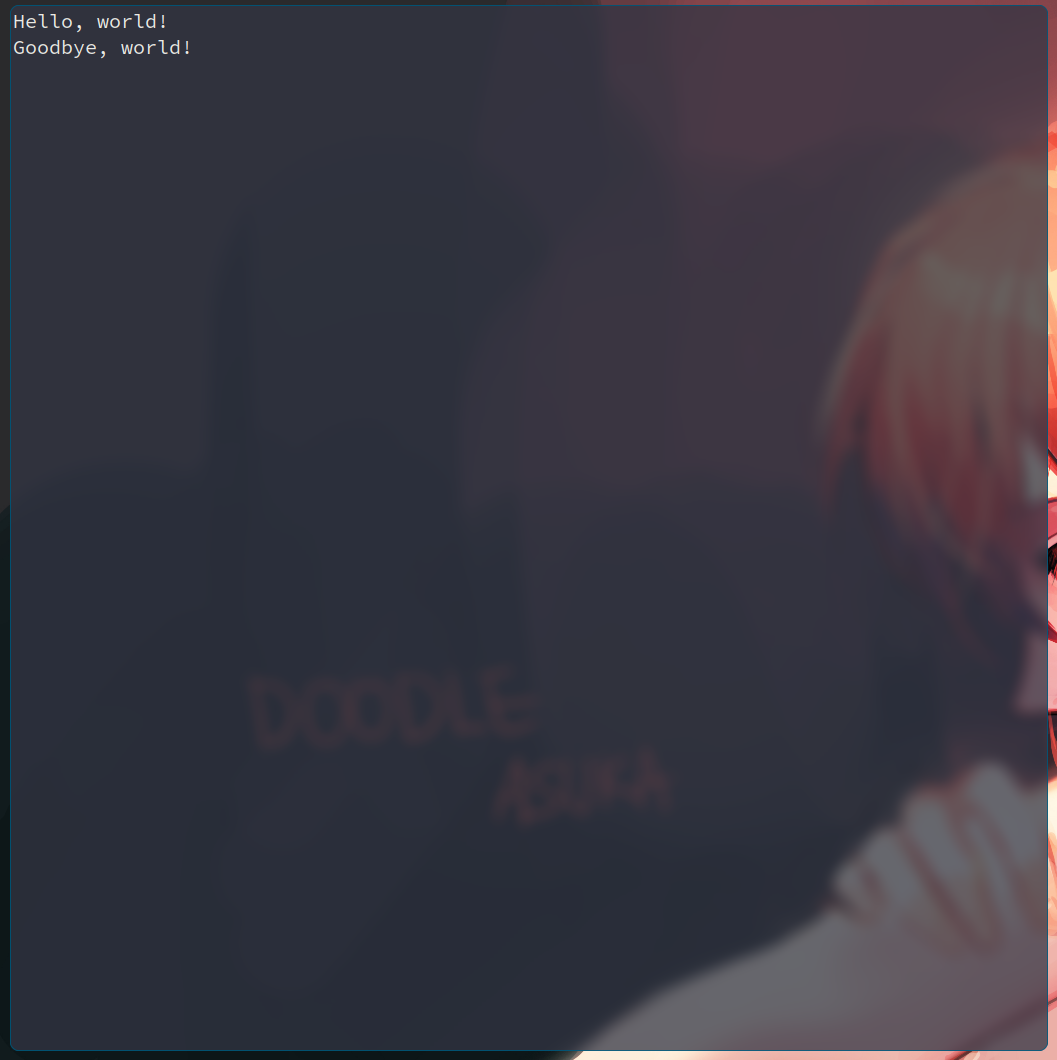
TextViewer 其用于创建文本浏览器的小部件,继承自 Curses::UI::TextEditor 类。其唯一区别是,-readonly 选项被强制设置为 true 值,因此其使用与 Curses::UI::TextEditor 相同。
示例代码:
1
2
3
4
5
6
7
8
9
10
11
12
13
use Curses::UI;my $cui = Curses::UI->new();my $win = $cui->add('window_id' , 'Window' );my $textviewer = $win->add( 'mytextviewer' , 'TextViewer' ,-text => "Hello, world!\n" "Goodbye, world!" sub print $editor->get(); exit (0 ) }, "\cQ" );
效果如:
Dialog 对话框 在 Curses::UI::Dialog 名称空间下.
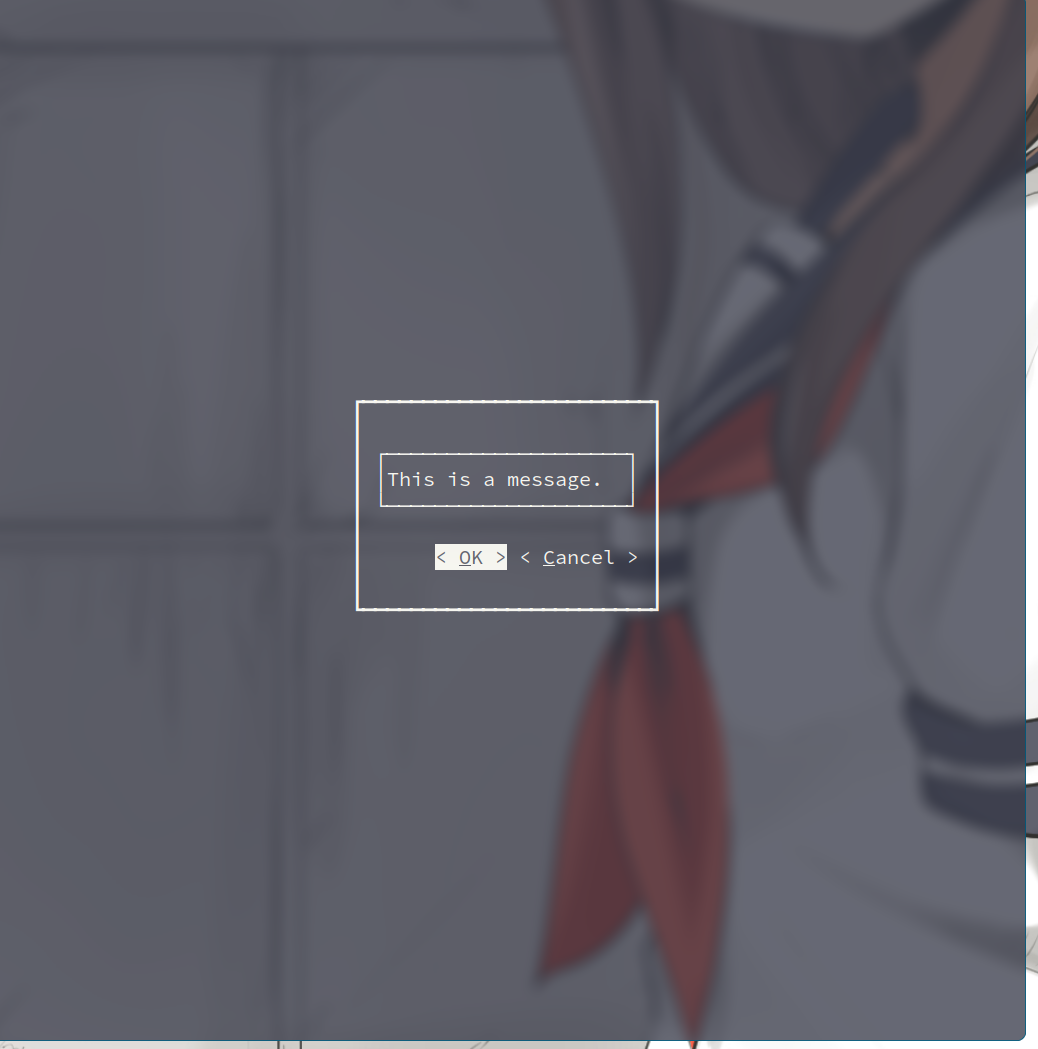
Basic 其用于创建基本对话框的小部件。通常展示消息给用户或者获取用户的确认信息.
示例代码:
1
2
3
4
5
6
7
8
9
use Curses::UI;my $cui = new Curses::UI;my $dialog = $cui->add('mydialog' , 'Dialog::Basic' ,-message => "This is a message." ,-buttons => [ 'ok' , 'cancel' ],sub exit (0 ) }, "\cQ" );
效果如;
(这里并未添加对 “按下按钮” 的处理)
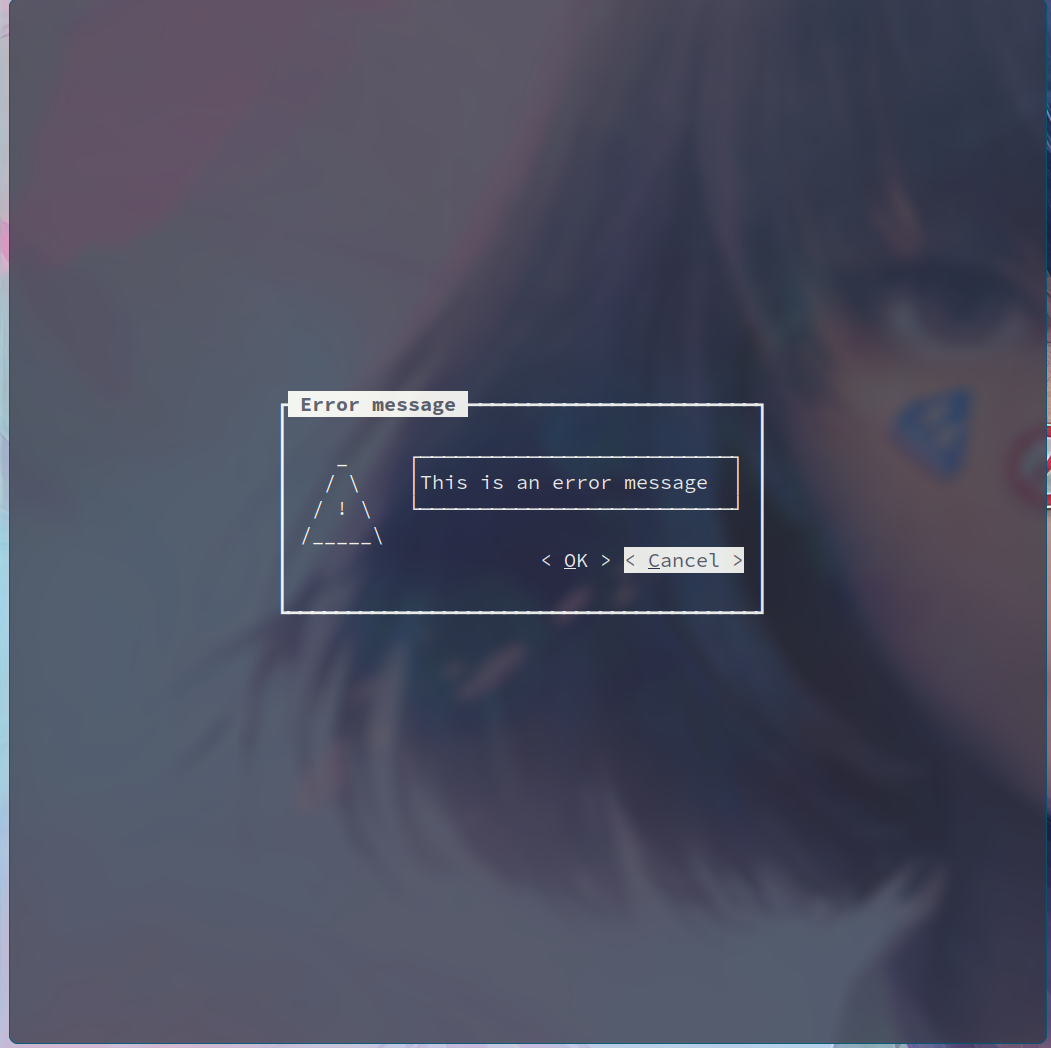
Error Curses::UI::Dialog::Error 模块和 Curses::UI::Dialog::Basic 模块基本相同,唯一不同的是在消息左侧绘制了一个警告标志.
示例代码:
1
2
3
4
5
6
7
8
9
10
11
use Curses::UI;my $cui = new Curses::UI;my $dialog = $cui->add('mydialog' , 'Dialog::Error' ,-message => "This is an error message" ,-buttons => [ 'ok' , 'cancel' ],
效果如:
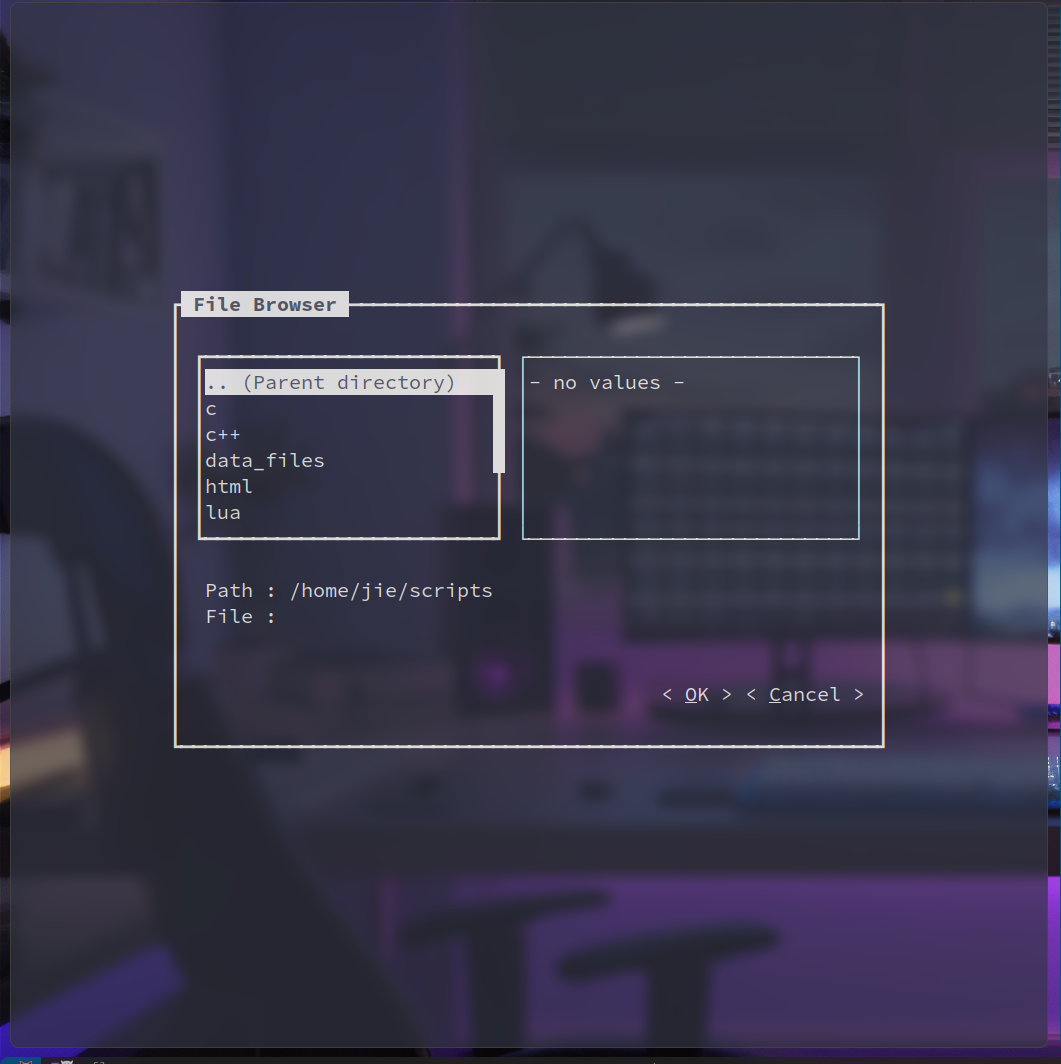
Filebrowser 其用于创建文件浏览器对话框.
代码示例如:
1
2
3
4
5
6
7
8
9
10
11
12
13
14
15
16
17
18
19
20
21
use Curses::UI;my $cui = new Curses::UI;my $filebrowser = $cui->add('my_filebrowser' , 'Dialog::Filebrowser' ,-title => "File Browser" ,-path => '/home/jie/scripts' ,sub select_handler my $return_value = shift ;"Selected file: $return_value" );sub exit (0 ) }, "\cQ" );"\n" );
效果如:
Status 其用于创建一个带有消息区域的状态对话框。状态对话框是一种特殊类型的基本对话框,它提供了状态消息显示区域和一个较小的按钮集合以供关闭对话框。
示例代码:
1
2
3
4
5
6
7
8
9
10
11
12
use Curses::UI;my $cui = new Curses::UI;my $status = $cui->add('my_status' , 'Dialog::Status' ,-message => "Ready" ,sub exit (0 ) }, "\cQ" );
或:
1
2
3
4
5
6
7
use Curses::UI;my $cui = new Curses::UI;-message => 'Some message' );sub exit (0 ) }, "\cQ" );
效果为;
技巧积累 显示到屏幕中央 1 2 3 4 5 6 7 8 9 10 11 12 13 14 15 16 17 18 my $win_width = 15 ;my $win_height = 5 ;my $cui = Curses::UI->new(-clear_on_exit => 0 ,-color_support => 1 ,my $win1 = $cui->add('window1' , 'Window' ,-title => 'Window 1' ,-width => $win_width,-height => $win_height,-border => 1 ,-x => ($cui->width()-$win_width)/2 ,'-y' => ($cui->height()-$win_height)/2 ,
键位绑定 使用 set_binding() 方法:
第一个参数为, 函数引用或匿名函数
第二个参数为, 键位, "\cX" 表示 Control-X
若要绑定到 <Esc>, 用:
1 2 3 $cui->set_binding(sub exit (0 );"\e" );
若一些键位绑定失效, 可能需要用到 Curses 模块中的一些宏定义, 如:
1
2
3
use Curses;sub
这里的 KEY_ENTER 就是回车.
label 的长度 在添加 label 时, 其 -text 的长度决定了后续用 text() 方法添加内容时的长度.
1
2
3
4
5
6
7
8
my $debug_label = $win_main->add('debug lable' , 'Label' ,-text => " " ,-x => 0 ,'-y' => 0 ,
添加 utf8 支持 补丁位置
Dialog 选中选项 默认似乎没有键可以用来选中.
定义 “键” 和 Buttonbox 一样, 如:
1
2
3
4
5
6
7
8
9
10
11
12
13
14
my $dialog = $win->add('mydialog' , 'Dialog::Basic' ,-message => 'Hello, world!' ,-buttons => [-label => '< Button 1 >' ,-value => 1 ,-label => '< Button 2 >' ,-value => 2 ,
但似乎 -shortcut 不起作用了.
用 Ctrol-i 来选中如:
1 $cui->set_binding( sub "$return" ); }, "\ci" );
获取返回值同样是 get() 方法.