Archwiki 介绍
Youtube 介绍
B 站介绍
参考博客
KVM, libvirt 的关系
KVM, Kernel-based Virtual Machine, 是 Linux 内核的一部分
libvirt 是一个开源的虚拟化管理工具集,提供了用于管理虚拟化平台的 API 和工具
可就是说 libvirt 是用于管理虚拟化的.
iso9660 文件类型 ISO 9660 文件系统定义了一种在光盘上组织和存储文件的结构.
在 Linux 系统上, 挂载一个 iso9660 文件, 如:
1 mount -t iso9660 -o loop,ro Fedora-Server-dvd-x86_64-38-1.6.iso /var/www/html/pxe/fedora38
-t (type) 指定文件系统类型.
-o (options) 指定挂载的参数, loop 选项表示将文件作为块设备挂载,ro 选项表示以只读模式挂载
挂载之后可以查看其目录结构:
1 2 3 [root@bastion-server fedora38]boot Fedora-Legal-README.txt LICENSE Packages
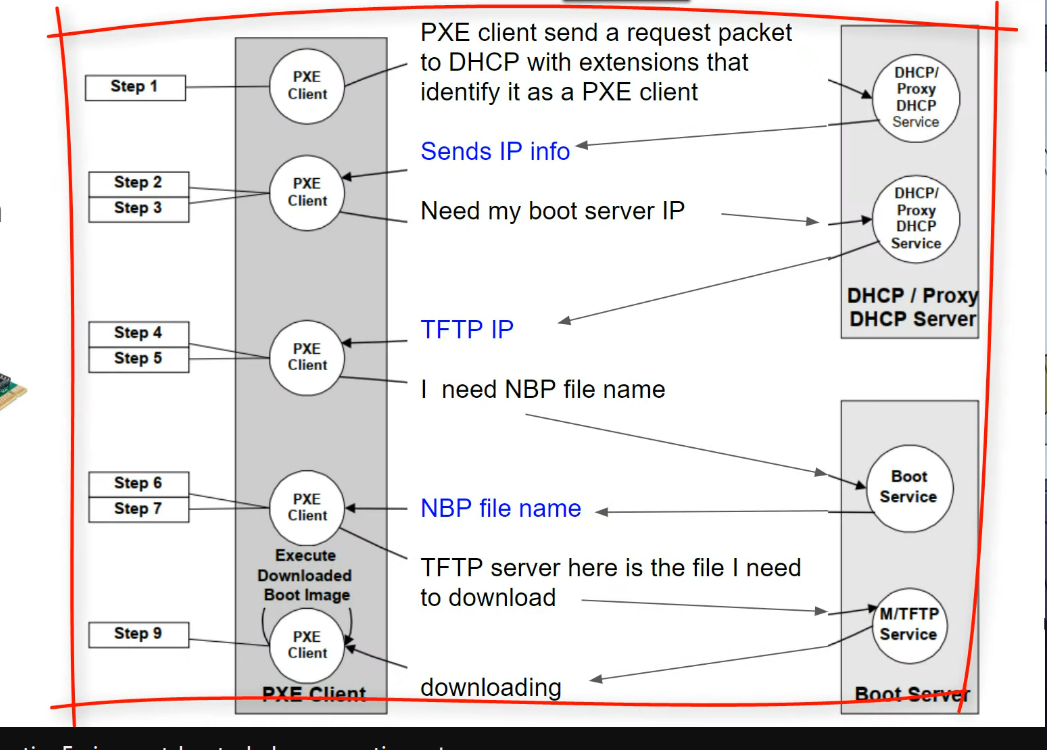
PXE 启动的组件和流程 PXE, Preboot eXecution Environment, 提供了一种通过网络引导计算机启动的方式. 使用 PXE, 计算机可以从网络上的服务器获取操作系统镜像, 并在启动时通过网络进行引导, 而不是从本地硬盘或其他存储设备引导。
需要的组件:
TFPT Server
DHCP Server
Kickstart and Media server
需要 NIC 支持 PXE 操作. 也需要在 BIOS 中开启.
Wake On LAN 是 PXE NICs 的另一个 feature.
PXE 可以用于 diskless 的主机 (即没有磁盘).
PXE 的具体工作过程为:
也就是说:
TFTP Server 提供 bootstrap 文件, 以及要安装的系统的 initrd.img 和 vmlinuz 文件
DHCP Server 提供 ip 分配以及 TFTP 的 ip 和引导文件的路径
Kickstart and Media server 提供系统的自动安装以及自定义脚本, Media server 如 httpd, 提供 iso 文件
正常情况下, 一个 Linux 系统安装完成之后, 其启动流程为:
BIOS 自检
读取引导程序
GRUB (一段固定的可执行代码)
BIOS 执行引导程序
引导程序读取配置文件 /boot/grub/grub.conf
因此 PXE 启动的具体流程为:
客户端启动系统, 选择从网卡启动
从 DHCP 服务器中获取到 IP 地址等信息
获取 tftp server 以及网络引导程序 pxelinux.0 的位置
通过网卡读取 tftp server 上的 pxelinux.0 文件到内存中
在内存中执行引导程序
读取引导程序的配置文件
DHCP 服务器介绍 TFTP 服务器介绍 Kickstart 介绍 用 QEMU 实验 PXE 启动 结构为:
System type
Hostname
IP Address
DHCP/TFTP/HTTP Server
pxe-test.net
192.168.177.2
Kickstart Server
pxe-test.net
192.168.177.2
Virtual Machine deployed via PXE
vm-test.net
Assigned by DHCP Server
创建 Virtual Network 需要创建一个不含 DHCP 功能的网桥, 便于让自己架设的用于 PXE 启动的 DHCP 服务器分配 IP.
需要用到 bridge-utils 包, Archlinux 下的安装为:
1 sudo pacman -S bridge-utils
编写 libvirt 网络定义文件:
内容如下:
1 2 3 4 5 6 7 8 9 10 11 <network > <name > br-pxe</name > <forward mode ='nat' > <nat > <port start ='1024' end ='65535' /> </nat > </forward > <bridge name ='br-pxe' stp ='on' delay ='0' /> <ip address ='192.168.177.1' netmask ='255.255.255.0' > </ip > </network >
libvirt 网络定义文件语法可查阅官方文档
用刚才定义的文件创建网络接口:
1 sudo virsh net-define --file br-pxe-net.xml
让网络接口自动启动:
1 sudo virsh net-autostart br-pxe
启动网络接口:
1 sudo virsh net-start br-pxe
查看网络接口:
1
2
sudo virsh net-list
让网络接口 UP:
1 sudo ip link set dev br-pxe up
打开防火墙:
1 sudo iptables -t nat -A POSTROUTING -o enp0s31f6 -s 192.168.78.1/24 -j MASQUERADE
创建堡垒虚拟机 (DHCP 和 TFPT, HTTPD 服务器) 在宿主机上需要使用 virt-builder 命令.
Archlinux 下的安装为:
1 sudo pacman -S guestft-tools
列出可用的 OS templates:
使用一个 Fedora 的模板:
1
2
3
sudo virt-builder fedora-38 --format qcow2 \
这里:
fedora-38 指定要用哪一个模板创建虚拟机/var/lib/libvirt/images/kvm-bastion-server.qcow2 是存放 VM qcow2 的路径StrongRootPassw0rd 是设置的密码
安装虚拟机:
1
2
3
4
5
6
7
8
9
10
11
12
13
sudo virt-install \
进入虚拟机后注意修改 root 密码, 毕竟之前指定了明文:
查看 IP 地址:
可以发现并未分配 IP, 因为此时关闭了原来的 DHCP 服务.
添加 IP:
1
2
3
4
5
6
7
[root@fedora ~] nmcli con showyes
(注意这里不一定叫 enp1s0, 看 nmcli con show 的输出)
重新启用网络接口:
1
2
[root@fedora ~] nmcli con down enp1s0 && sudo nmcli con up enp1s0
设置堡垒机的 hostname:
1 [root@fedora ~] hostnamectl set-hostname pxe-test.net
设置时区:
1
2
[root@fedora ~] timedatectl set-timezone Asia/Shanghai
若在宿主机上想要让这个虚拟机每次自动开启:
1 sudo virsh autostart kvm-bastion-server
配置 DHCP 服务 进入安装的 fedora 虚拟机, 之后先安装一些基本的软件:
1
2
[root@fedora ~] dnf -y upgrade
重启虚拟机:
安装 DHCP server:
1 [root@fedora ~] dnf -y install dhcp-server
备份配置文件:
1 [root@fedora ~] mv /etc/dhcp/dhcpd.conf{,.bak}
创建新的配置文件:
1 [root@fedora ~] vim /etc/dhcp/dhcpd.conf
文件内容为:
1
2
3
4
5
6
7
8
9
10
11
12
13
14
15
16
17
18
19
20
21
22
23
24
25
26
27
authoritative;
enable 并启动 DHCP 服务:
1
2
[root@fedora ~] systemctl enable --now dhcpd
开启 DHCPD 的防火墙:
1
2
[root@fedora ~] firewall-cmd --add-service=dhcp --permanent
配置 TFTP 服务器 安装 TFTP 和 syslinux 的包:
1 [root@fedora ~] dnf -y install tftp-server syslinux
syslinux 包中有一个叫做 pxelinux.0 的文件.
pxelinux.0
pxelinux.0 文件是一个 network boot loader program 且与系统无关, 而普通的 Linux 安装时的引导程序为 grub2(磁盘的零磁道的第一个扇区).
其配置文件位于 pxelinux.cfg 文件夹下, 默认文件名为 default. 修改配置文件可以定制引导菜单.
启动 tftp 服务:
1 [root@fedora ~] systemctl enable --now tftp.socket
开启防火墙:
1
2
[root@fedora ~] firewall-cmd --add-service=tftp --permanent
将 pxelinux.0 文件以及其他一些 syslinux 下的文件移动到 tftp 服务的根目录下:
1
2
3
[root@fedora ~] cp /usr/share/syslinux/pxelinux.0 /var/lib/tftpboot/cp /usr/share/syslinux/{menu.c32,vesamenu.c32,ldlinux.c32,libcom32.c32,libutil.c32} /var/lib/tftpboot/mkdir /var/lib/tftpboot/pxelinux.cfg
安装和配置 httpd 服务 安装:
1 [root@fedora ~] dnf -y install httpd
修改默认端口为 8080:
1
2
3
[root@fedora ~] vim /etc/httpd/conf/httpd.conf
启动 httpd 服务:
1 [root@fedora ~] systemctl enable --now httpd
开启防火墙:
1
2
[root@fedora ~] firewall-cmd --add-port=8080/tcp --permanent
删除 httpd 的默认欢迎页面并重启服务:
1
2
[root@fedora ~] rm /etc/httpd/conf.d/welcome.conf
下载 OS installation DVD ISO files 有些 ISO 文件挂载之后缺少 images 目录以及其下的文件, 而 DVD 镜像一般包括这些文件, 参考的博客里下载了以下系统的镜像:
1
2
[root@fedora ~] mkdir pxe_iso_filescd pxe_iso_files
CentOS Stream 8
1 [root@fedora ~] wget http://centos.mirror.liquidtelecom.com/8-stream/isos/x86_64/CentOS-Stream-8-x86_64-latest-dvd1.iso
Rocky Linux 8
1 [root@fedora ~] wget https://download.rockylinux.org/pub/rocky/8/isos/x86_64/Rocky-8.8-x86_64-dvd1.iso
AlmaLinux 8
1 wget http://iad.mirror.rackspace.com/almalinux/8.8/isos/x86_64/AlmaLinux-8.8-x86_64-dvd.iso
Oracle Linux 8
1 wget https://yum.oracle.com/ISOS/OracleLinux/OL8/u5/x86_64/OracleLinux-R8-U5-x86_64-dvd.iso
Fedora 36 Server
1 wget https://fedora.mirror.liquidtelecom.com/fedora/linux/releases/38/Server/x86_64/iso/Fedora-Server-dvd-x86_64-38-1.6.iso
这里直接上 清华源 下一些也可以.
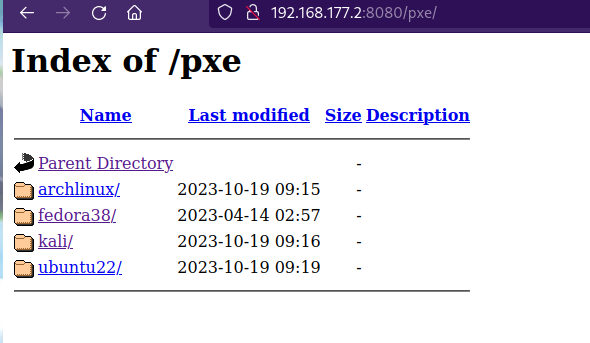
挂载 ISO 文件到 Web 服务下 1 2 3 [root@fedora ~] cd pxe_iso_filesls -lmkdir /var/www/html/pxe
如挂载 CentOS-Stream-8-x86_64-latest-dvd1.iso:
1 2 [root@fedora ~] mkdir /var/www/html/centos8stream
挂载其他镜像也是一样的.
查看挂载情况:
1 df -hT | grep /var/www/html/pxe
可以在浏览器查看, 访问 192.168.177.2:8080 :
将 Linux 内核文件 vmlinuz 以及 initrd.img 文件 (initial RAM disk image) 拷贝到 tftp 服务根目录下的目录中:
1 2 [root@fedora ~] mkdir /var/lib/tftpboot/centos8streamcp /var/www/html/pxe/centos8stream/images/pxeboot/{initrd.img,vmlinuz} /var/lib/tftpboot/centos8stream
(这些文件会在 pxelinux.0 文件进行引导时使用)
配置 Kickstart 为每个 Linux 发行版都需要编写 Kickstart 的配置:
Kickstart 的配置同样通过 httpd 获取:
1 2 [root@fedora ~] mkdir /var/www/html/ks
CentOS ks.cfg 1 2 3 4 5 6 7 8 9 10 11 12 13 14 15 16 17 18 19 20 21 22 23 24 25 26 27 28 29 30 31 32 33 34 35 36 37 38 39 40 41 42 43 44 45 46 47 48 49 50 51 52 53 54 55 56 57 --agreed --url= "http://192.168.177.2:8080/pxe/rockylinux8" --name= "AppStream" --baseurl=http ://192.168.177.2 :8080 /pxe/rockylinux8/AppStream--bootproto=dhcp --hostname=localhost .localdomain--iscrypted replace-me-with-encrypted-password--vckeymap=us --xlayouts= 'us'--isUtc --enable --only-use=vda --none --initlabel --nohome --nolvm --noboot --ignoremissing --instLangs=en_US .utf8
Fedora ks.cfg 1 2 3 4 5 6 7 8 9 10 11 12 13 14 15 16 17 18 19 20 21 22 23 24 25 26 27 28 29 30 31 32 33 34 35 36 37 38 39 40 41 42 43 44 45 46 47 48 49 50 51 52 53 54 # License agreementEnable graphical installation#Base installation source #Network bootproto and hostname Encrypted root password #rootpw --plaintext root_password_in_clear_text System Locale-8 #Timezone on first boot#Initialize partition tables #Single / partion #Reboot after installation #Packages to install policy -develend
OpenEuler22 ks.cfg 1 2 3 4 5 6 7 8 9 10 11 12 13 14 15 16 17 18 19 20 21 22 23 24 25 26 27 28 29 30 31 32 33 34 35 36 37 38 39 40 41 42 43 44 45 --agreed --url= "http://192.168.177.2:8080/pxe/openEuler22" --bootproto=dhcp --hostname=localhost .localdomain--plaintext 123--vckeymap=us --xlayouts= 'us'--isUtc --enable --only-use=vda --none --initlabel --nohome --nolvm --noboot --ignoremissing --instLangs=en_US .utf8
配置 PXE 启动 这里就是配置 pxelinux.0:
1 [root@fedora ~] vim /var/lib/tftpboot/pxelinux.cfg/default
文件内容如:
1 2 3 4 5 6 7 8 9 10 11 12 13 14 15 16 17 18 default menu.c32 default initrd =centos8stream/initrd.img ip =dhcp inst.repo =http://192.168.177.2:8080/pxe/centos8stream inst.ks =http://192.168.177.2:8080/ks/centos8stream-ks.cfg Server default initrd =fedora/initrd.img ip =dhcp inst.repo =http://192.168.177.2:8080/pxe/fedora inst.ks =http://192.168.177.2:8080/ks/fedora-ks.cfg
需要注意这里的一些路径.
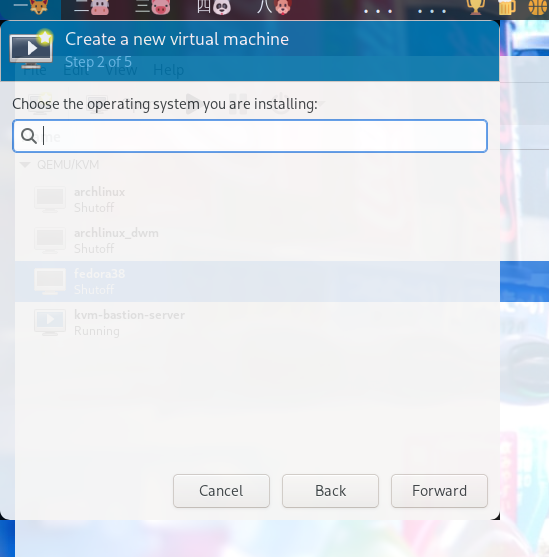
创建一个虚拟机来测试 这里演示用 Virt-Manager 的方式:
创建虚拟机时选择手动安装:
选择 Linux 发行版:
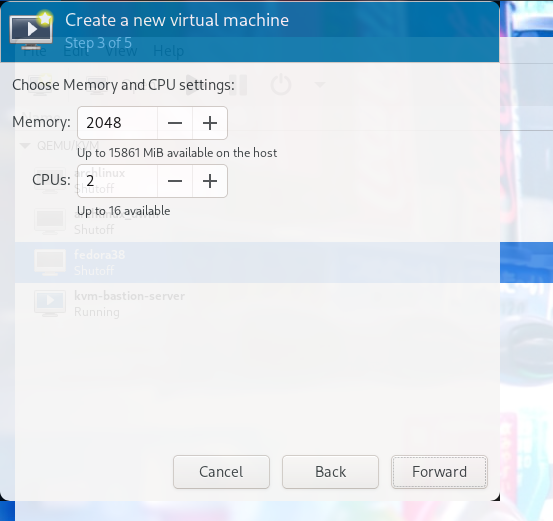
分配资源:
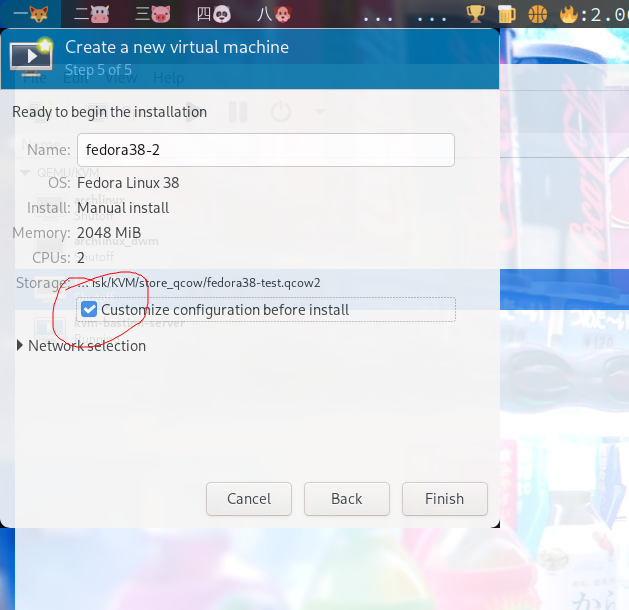
选择安装前配置:
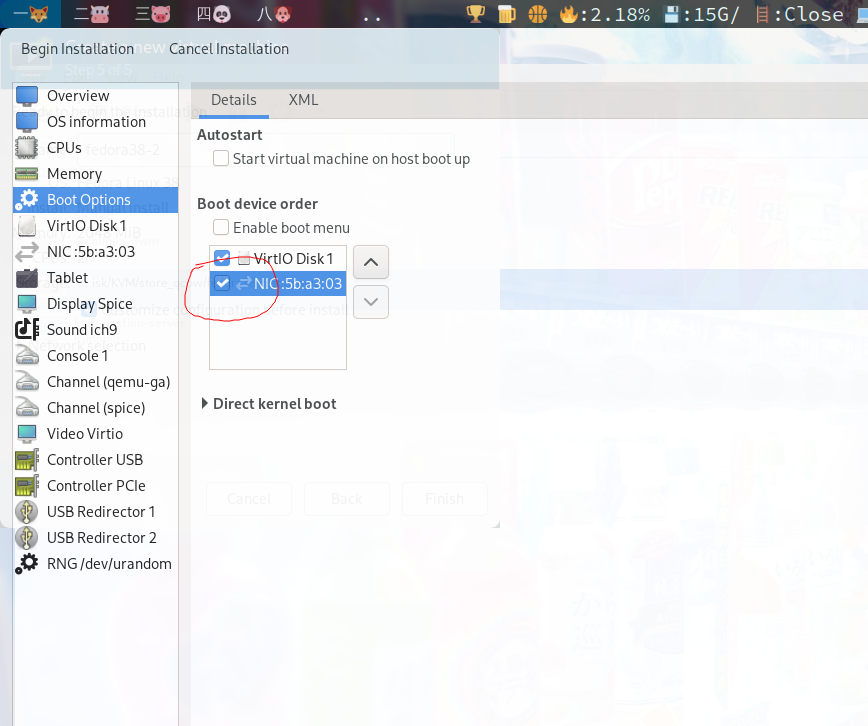
开启用网卡启动:
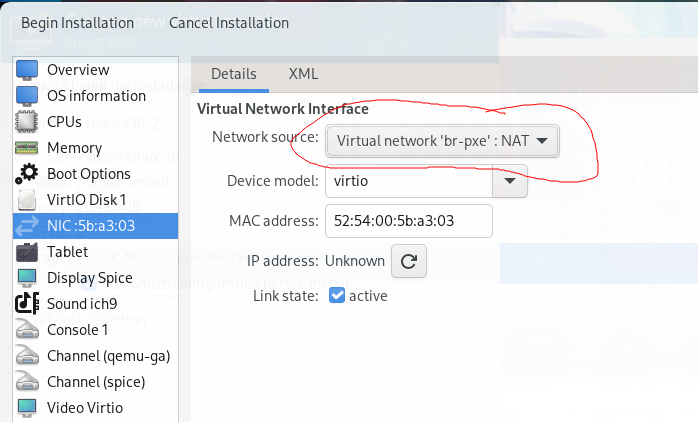
选择之前创建的网桥:
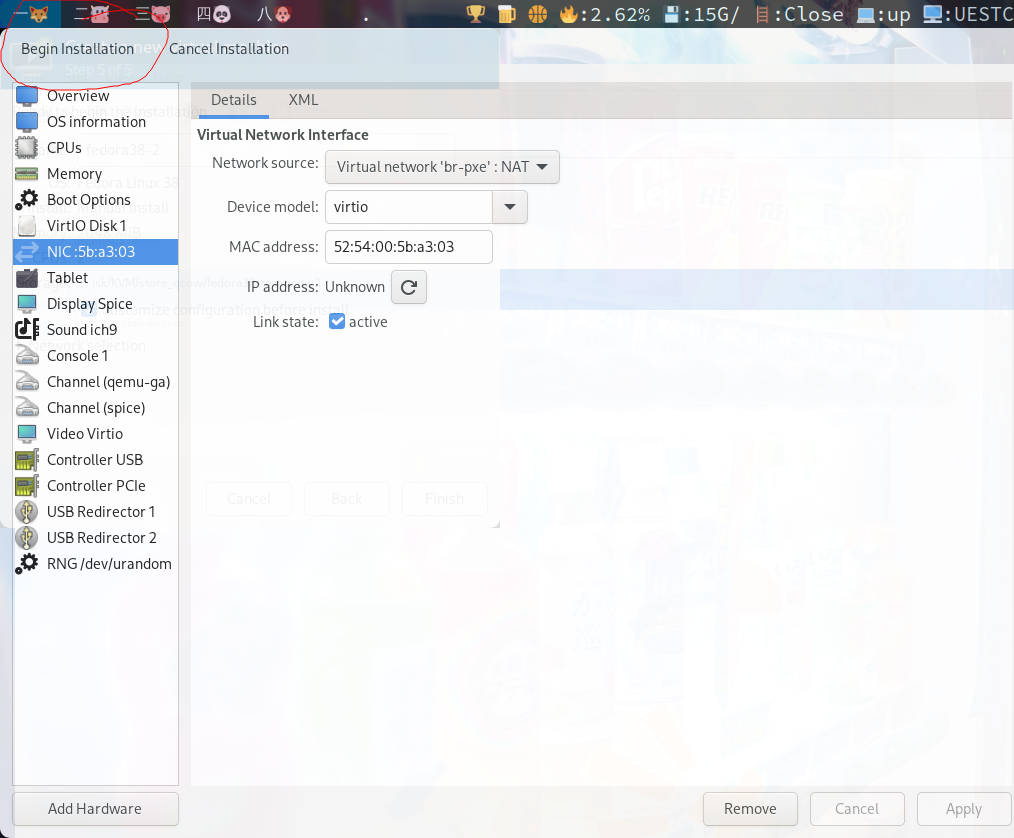
开始安装:
进入引导:
开始 Kickstart 接管:
基本完成.