建立-IRC-服务器

UnrealIRCd 官网

介绍

这里用 UnrealIRCd 来搭建.

UnrealIRCd 是一个开源的 IRC Server 软件, 其模块化以及安全做得比较好, 可以用配置文件深度配置.

安装

从源码编译安装

官网上的详细步骤

至少需要编译器以及 OpenSSL library, 以 Ubuntu 为例:

1
sudo apt-get install build-essential pkg-config gdb libssl-dev libpcre2-dev libargon2-dev libsodium-dev libc-ares-dev libcurl4-openssl-dev

在 Fedora 上可能为:

1
sudo dnf install -y @development-tools openssl-devel pcre2-devel argon2-devel libsodium-devel c-ares-devel libcurl-devel openssl

注意不要用 root 编译和运行 IRCd.

具体步骤如下:

1
2
3
4
5
6
wget --trust-server-names https://www.unrealircd.org/downloads/unrealircd-latest.tar.gz
tar xzvf unrealircd-6.1.X.tar.gz
cd unrealircd-6.1.X
./Config
make
make install

也可以用 git 拉取:

1
2
git clone https://github.com/unrealircd/unrealircd.git
cd unrealircd

包管理器

比如在 Archlinux 上可直接用 pacman 安装:

1
sudo pacman -S unrealircd

Docker 安装

1
docker pull ircd/unrealircd

(似乎拉不下来?)

相关概念

cloak key

cloak 原义 “斗篷, 披风”, cloak key 也可以称 vhost key, 主要用于为用户提供虚拟主机名 (virtual host).

使用 cloak key, 可以让用户在连接到 IRCC 服务器时使用虚拟主机名 (用户的), 从而隐藏真实的 IP 地址.

配置

创建配置文件

1
2
cd ~/unrealircd
cp conf/examples/example.conf conf/unrealircd.conf

(~/unrealircd 为前面编译的目录)

配置语法

官方配置语法文档
UnrealIRCd 都使用 block-based-format (也就是基于 “块”), 比如:

1
2
3
<block-name> <block-value> {
<block-directive> <directive-value>;
}
  • <block-value> 有些不需要设置
  • <block-directive> 行需要以 ; 结尾
  • <directive-value> 也可以是一个 block

比如:

1
2
3
4
5
6
7
8
9
10
11
12
13
14
15
16
17
18
19
20
21
22
23
24
me {
name "irc.something.net";
sid 001;
info "Some nice server";
}

log ircd.log {
flags {
errors;
}
}

set {
maxchannelsperuser 10;

options {
hide-ulines;
}

anti-flood {
connect-flood 3:60;
nick-flood 3:60;
}
}

上述的定义可以用一种特殊的 notation 来引用, 比如第一个 block 中的 name, 可以记为 me::name

注释可以为:

1
2
3
4
5
# This is a single line comment (type 1)
// This is also a single line comment (type 2)
/* This is a
multi line
comment */

基本使用

启动服务

1
./unrealircd start

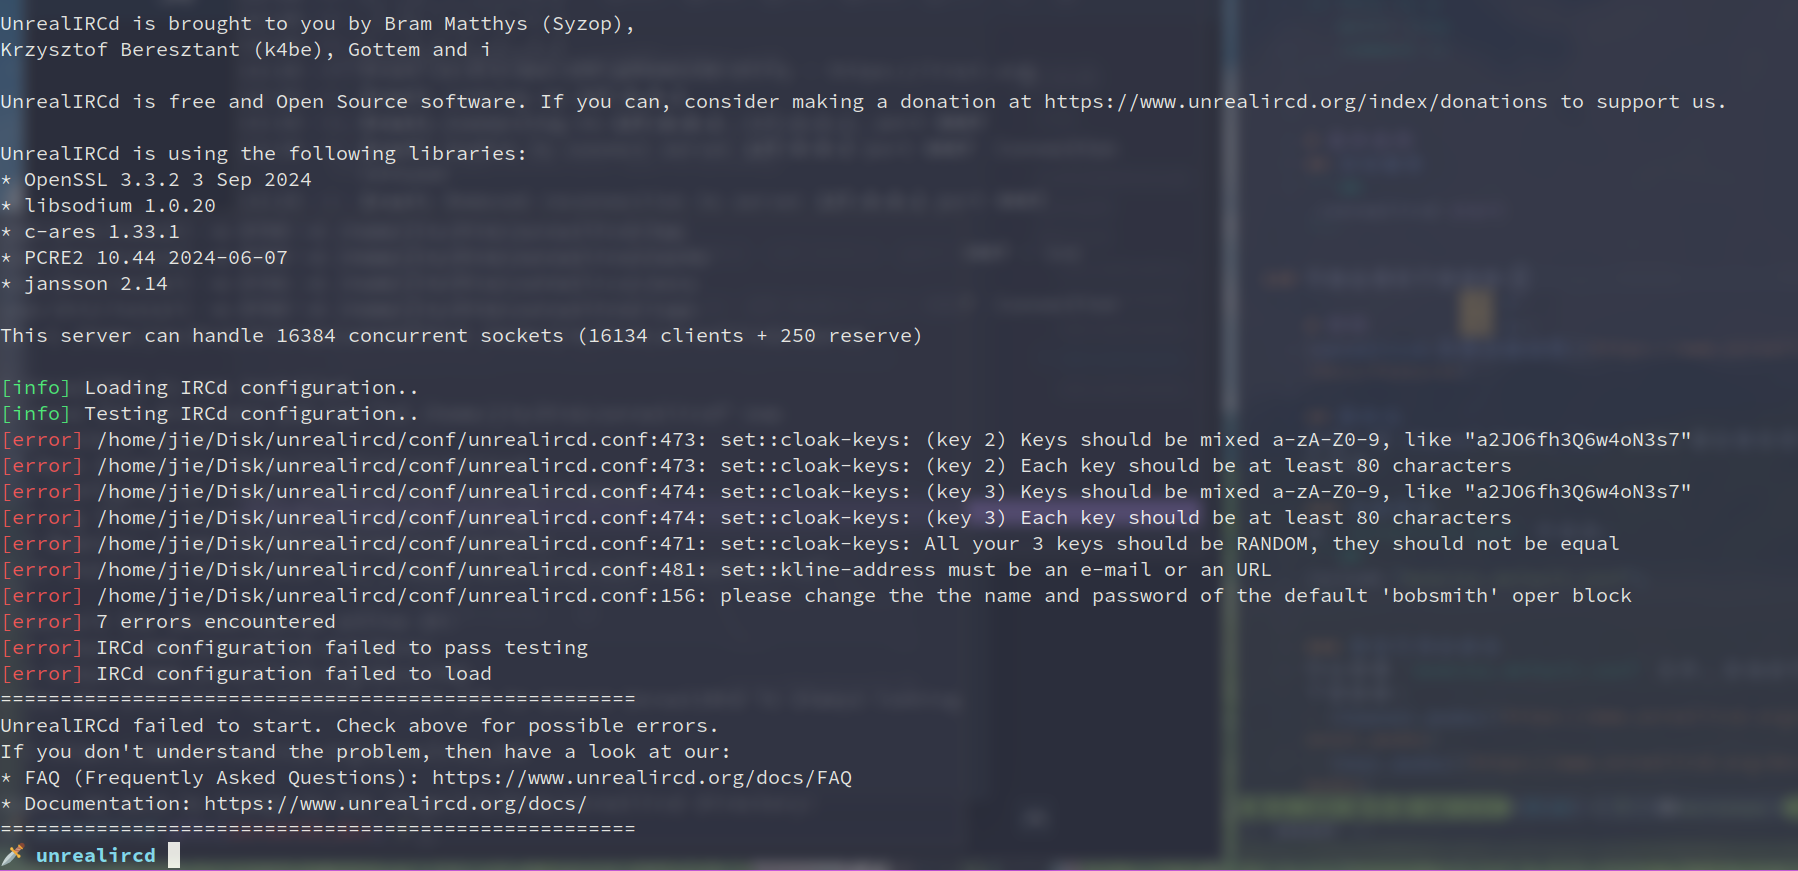
可能会遇到下面报错:

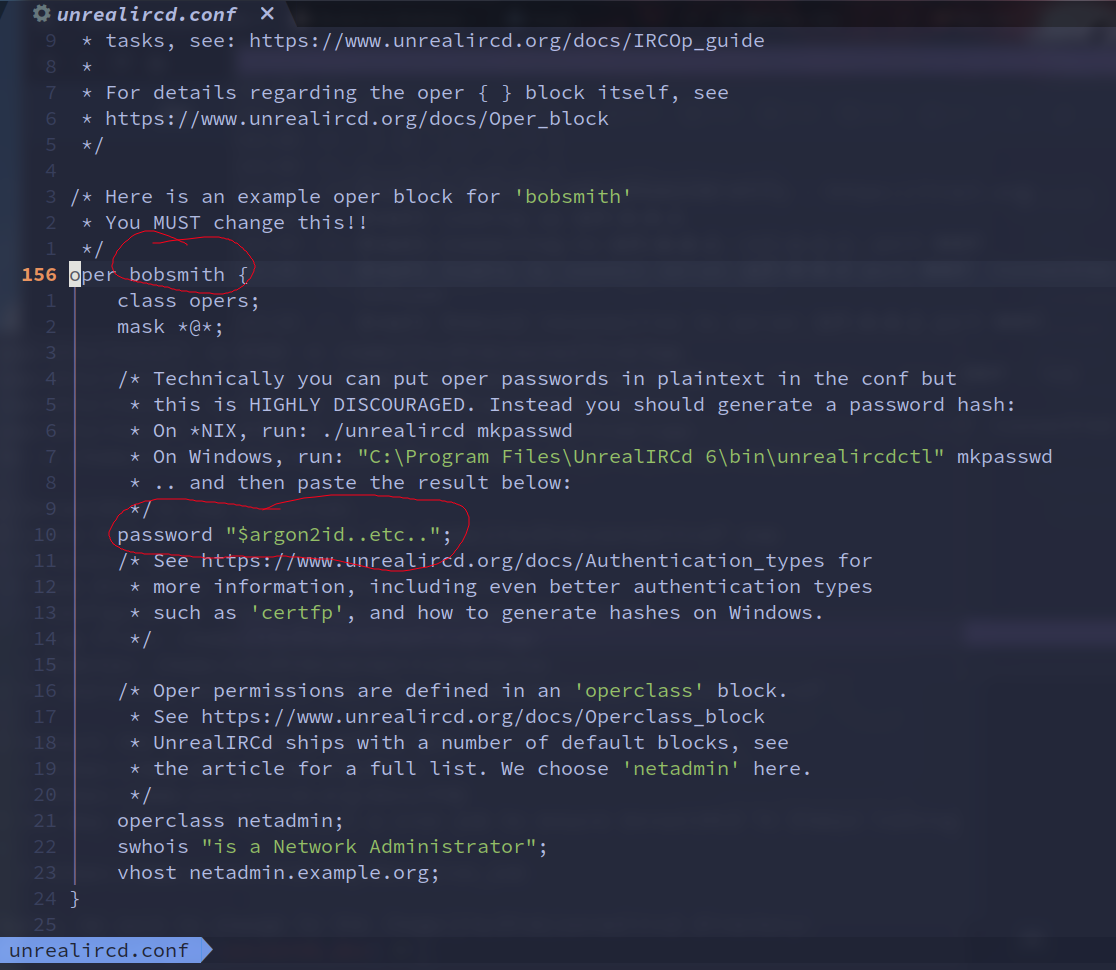
先修改 OPER 用户及其密码:

密码注意用 hash 值.

对于 cloak-keys 报错, 先运行:

1
./unrealircd gencloak

将输出的 keys 粘贴到配置文件即可.

之后修改 kline-address 为一个邮箱地址即可.

特性

unrealircd 官网详细说明

模块化

比如一些 channel modes, user modes 都在模块里可以自己添加.

加载模块

unrealircd.conf 中添加:

1
include "modules.default.conf";

查找可用的模块

可以查看 modules.default.conf 文件, 其他的可以查看下面链接:

第三方模块, 可在 这里查找.

如何使用第三方模块可查看 How to install 3rd party modules.

认证

比如可以限制连接的 IP, 具体可以看 这里.

SSL/TLS

几乎所有 IRC 客户端都支持 SSL/TLS, 但需要在连接时指定启用了 SSL 的端口 (具体配置可见 官方文档), 默认是 6697.

比如用 irssi 连接时:

1
/connect -tls name.of.server 6697

默认情况, UnrealIRCd 会创建一个自签名证书, 但大多情况下 client 会将其标记为 untrusted 导致 refuse to connect. 可以用 Let's Encrypt 自己申请.

Oper block

官网具体内容

可以在 oper block 中定义 IRC Operator 账号. 之后则可以用 /OPER 切换到 IRCOp 账号.

定义语法为:

1
2
3
4
5
6
7
8
9
10
11
12
13
14
15
16
17
18
oper <name> {
/* Required items: */
mask <hostmask>;
class <class-name>;
operclass <operclass-name>;
/* Optional items to further limit who can /OPER */
password <password>;
auto-login <yes|no>;
require-modes <modes>
maxlogins <num>;
/* Optional items to define what will be set upon successful /OPER */
vhost <new virtual hostname>;
swhois <whois info>;
modes <modes>;
snomask <snomask>;
server-notice-colors yes|no;
server-notice-show-event yes|no;
};
  • <name><password> 用于切换到 OPER 用户时的认证, 如 /OPER name password
  • mask 指定哪些 host/IP 可以登录到 OPER, 比如 mask *; 表示允许所有, mask { 192.168.0.0/16; *.example.net; } 指定 host/IP
  • class, 用于管理用户权限, 定义 class 的语法后头讲
  • operclass, 用于配置 IRCOp 权限, 默认 list of operclasses 可以在 这里查看, 权限最高的为 netadminnetadmin-with-override
  • auto-login, 对于满足 mask 的 host/IP 可以免密登录
  • maxlogins, 限制同时从 host/IP 登录的用户数
  • vhost, “virtual host”, 在登录成功后会设置成 hostname
  • swhois, 添加信息到 /WHOIS 的输出, 比如 swhois "a Network Administrator";
  • modes, 用于设置 user modes
  • snomask, “server notice mask”, 即设置一个 mask, 控制给用户的通知信息, 默认使用 set::snomask-on-oper 设置的值
  • auto-join, 设置登录到 OPER 时加入的 channel, 如 auto-join "#opers,#staff";. 默认情况下登录到 set::oper-auto-join 的值

示例:

1
2
3
4
5
6
7
oper bobsmith {
class opers;
mask { smithco.com; *.somedialupisp.com; };
password "f00";
operclass netadmin;
swhois "a Network Administrator";
};

IRC Operator Guide

具体内容可见官网

IRC Operator 的一些权限包括:

  • 可以加入任何 channel
  • 可以获取任何 channel 的管理员权限
  • 可以 kick or ban a user

踢出一个 user

即让一个 user 断开连接:

1
/KILL nickname reason

(用户可以尝试重新连接)

Ban 掉一个用户

可以指定 ban 的时间, 即这段时间内无法连接上当前服务器:

1
/KLINE *@blah.example.org 3600 please go away for at least an hour

也可以让用户无法连接到整个网络中的所有服务器, 如:

1
/GLINE *@blah.example.org 7200 please go away for at least two hours

若用 /ZLINE/GZLINE, 可以让用户不产生 handshake.

解除一个用户的 ban 状态

/ELINE 如:

1
/ELINE *@198.51.100.1 kGzZ 0 Trusted user

也可以用 /KLINE:

1
/KLINE -user@host

之后用户就可以重新连接到服务器.

防止部分用户被 ban 掉

1
2
3
4
except ban {
mask *@198.51.100.1;
type all;
};

这样来自 198.51.100.1 的所有主机都不会被 ban.

查看信息

用户列表

1
/WHO

可以查看连接到 network 的所有用户.

1
/WHO +R

可以查看所有 real hosts.

1
/WHO +I

可以查看所有 IP addresses.

查看用户详细信息

1
/WHOIS nickname

查看 channel 列表

1
/LIST

查看 ban list

1
/MODE #channel b

查看 channel members

1
/NAMES #channel

或:

1
/WHO #channel

加入本不可加入的 channel

如果加入一个 channel 时报错 Channel is invite only (+i), 则可:

1
2
/INVITE myself #drones
/JOIN #drones

若有 override 权限, 则可用:

1
/SAJOIN myself #drones

更换 modes

如果有 override 权限, 则可改变 channel 的权限:

1
/MODE #channel -i

让自己无法被 ban

1
/MODE yournick +q

Linking Servers

如果想让 IRC network 跑在多个 server 上, 则需要 “link”.

同一个 network 下的 server 可以:

  • 共享同一个网络名称
  • 无论连接哪个服务器都能看到整个网络中的其他用户和频道
  • 消息在各服务器都是同步的

具体搭建方式可见官网.

主要用 link block 来定义 (步骤比较靠后才用到).

需要注意的是 server id 的设置需要不同才行.

单独开一个 server 间交流的 ssl 端口

在各 servers 上的配置中添加:

1
listen *:6900 { options { ssl; serveronly; }; };
  • serveronly 表明仅用于 server 间交流

创建一个单独的 class 管理 servers 的设置

1
2
3
4
5
6
7
class servers
{
pingfreq 60;
connfreq 30;
maxclients 10;
sendq 20M;
};
  • pingfreq 60, 指的是服务器间每 60s 发送一次心跳 (ping) 请求以确认连接是否仍然有效
  • connfreq 30, 指的是在两台服务器之间尝试重新连接的时间间隔. 如果一台服务器断开了与另一台服务器的连接, 它将在 30 秒后尝试重新连接
  • maxclients 10, 是每台服务器允许的最大客户端连接数
  • sendq 20M, 是服务器的发送队列大小, 单位为兆字节 (MB). 它定义了服务器可以在内存中为待发送消息保留的最大空间

获取 servers 的 SPKI fingerprint

SPKI (Subject Public Key Info) 指纹是一个与 SSL/TLS 证书相关的唯一哈希值 (用于区分不同的证书). 它是通过对证书中的公钥部分进行哈希计算生成的, 通常使用 SHA-256 或 SHA-1 算法.

可以通过:

1
./unrealircd spkifp /path/to/cert

获取.

输出如:

1
2
3
4
5
The SPKI fingerprint for certificate /home/irc/unrealircd/conf/ssl/server.cert.pem is:
AHMYBevUxXKU/S3pdBSjXP4zi4VOetYQQVJXoNYiBR0=

You normally add this password on the other side of the link as:
password "AHMYBevUxXKU/S3pdBSjXP4zi4VOetYQQVJXoNYiBR0=" { spkifp; };

这个输出用到后续的 link block 中.

比如有两台 servers, 一台为 alpha.test.net, 另一台为 beta.test.net.

alpha.test.net 上的 unrealircd.conf, 添加:

1
2
3
4
5
6
7
8
9
10
11
12
13
14
link beta.test.net {
incoming {
mask *;
};
outgoing {
bind-ip *; /* or explicitly an IP if you have a shell provider, as mentioned in step 1 */
hostname beta.test.net; /* or if 'beta.test.net' does not exist then you can use an IP or something like 'beta.dyndns.org' */
port 6900; /* the special SSL server port we opened up earlier */
options { ssl; };
};
password "AHMYBevUxXKU/S3pdBSjXP4zi4VOetYQQVJXoNYiBR0=" { spkifp; }; /* put the SPKI fingerprint of beta.test.net here (see step 3) */
hub *;
class servers;
};
  • link beta.test.net 定义一个 link block, 名字需要与对方服务器的 me block 中的 name 相同
  • incoming 定义了哪些其他服务器可以连接到当前服务器的设置
  • outgoing 定义了当前服务器要连接到哪个其他服务器的设置
    • bind-ip 指定用哪个本地接口连接
    • hotsname 指定要连接的远程服务器的主机名, 可以是域名或 ip
  • hub *; 将该服务器设置为一个 hub 服务器, 表示它可以连接到其他服务器并转发消息
  • class servers;, 用 servers 类中定义的行为

beta.test.net 上的 unrealircd.conf 中添加:

1
2
3
4
5
6
7
8
9
10
11
12
13
14
link alpha.test.net {
incoming {
mask *;
};
outgoing {
bind-ip *; /* or explicitly an IP if you have a shell provider, as mentioned in step 1 */
hostname alpha.test.net; /* or if 'alpha.test.net' does not exist then you can use an IP or something like 'alpha.dyndns.org' */
port 6900; /* the special SSL server port we opened up earlier */
options { ssl; autoconnect; };
};
password "12355894363289463286489263984632896432643=" { spkifp; }; /* put the SPKI fingerprint of alpha.test.net here (see step 3) */
hub *;
class servers;
};

重新加载配置

用客户端连接上 IRC 服务器, 然后用:

1
/OPER

登录到 IRCOp, 之后:

1
/REHASH

即可.

connect 到 network 之后:

1
/MAP

即可查看.

负载均衡

可见 官网相关内容.

DNS round robin

比如现在的组网如果为:

  • irc1.example.net, IP 为 1.1.1.1
  • irc2.example.net, IP 为 2.2.2.2
  • irc.example.net 的 DNS 记录指向上述两个 server

此时对 irc.example.net 的访问就会 50%/50% 分配到后端服务器.

永久设置选项

默认情况下对 channel 的设置是临时的, 需要加上 +P “Permanent” 选项 (会写入数据库文件).

网页管理页面

UnrealIRCd 提供了一个网页可查看服务, 用户信息. (需要额外配置和安装)

安装

这里以 fedora 以及 apache 为例:

1
sudo dnf install -y httpd php php-zip php-curl php-mbstring composer

之后需要让 unrealircd 加载 JSON-RPC 模块, 在 unrealircd.conf 文件中加入:

1
include "rpc.modules.default.conf";

之后添加监听的端口以及用户:

1
2
3
4
5
6
7
8
9
10
11
12
13
/* HTTPS on port 8600 for the JSON-RPC API */
listen {
ip *;
port 8600;
options { rpc; }
}

/* API user */
rpc-user adminpanel {
match { ip 127.*; }
rpc-class full;
password "password";
}

配置

假设:

  • Webroot 为 /var/www/html
  • panel 相关位于 Webroot 下的 unrealircd-webpanel 目录
  • Webuser 为 www-datanobody (或 http 等)
1
2
3
4
cd /var/www/html
sudo -u www-data git clone https://github.com/unrealircd/unrealircd-webpanel
cd unrealircd-webpanel
sudo -u www-data composer install

之后就能用 http://localhost/unrealircd-webpanel/ 来访问.

注意配置好 apache 的 php 模块. 这里是一些可能遇到的问题.

打开页面是 php 源码

安装相关包, 以 Archlinux 为例:

1
sudo pacman -S apache php php-apache

httpd.conf 中添加:

1
2
AddType application/x-httpd-php .php
LoadModule php_module modules/libphp.so

也要修改线程类型:

1
2
#LoadModule mpm_event_module modules/mod_mpm_event.so
LoadModule mpm_prefork_module modules/mod_mpm_prefork.so

之后:

1
sudo systemctl restart httpd

未启用 sodium 扩展

安装 php-sodium:

1
sudo pacman -S php-sodium

配置, 修改 /etc/php/php.ini 文件, 添加:

1
extension=sodium

之后:

1
2
php -m | grep sodium
sudo systemctl restart httpd

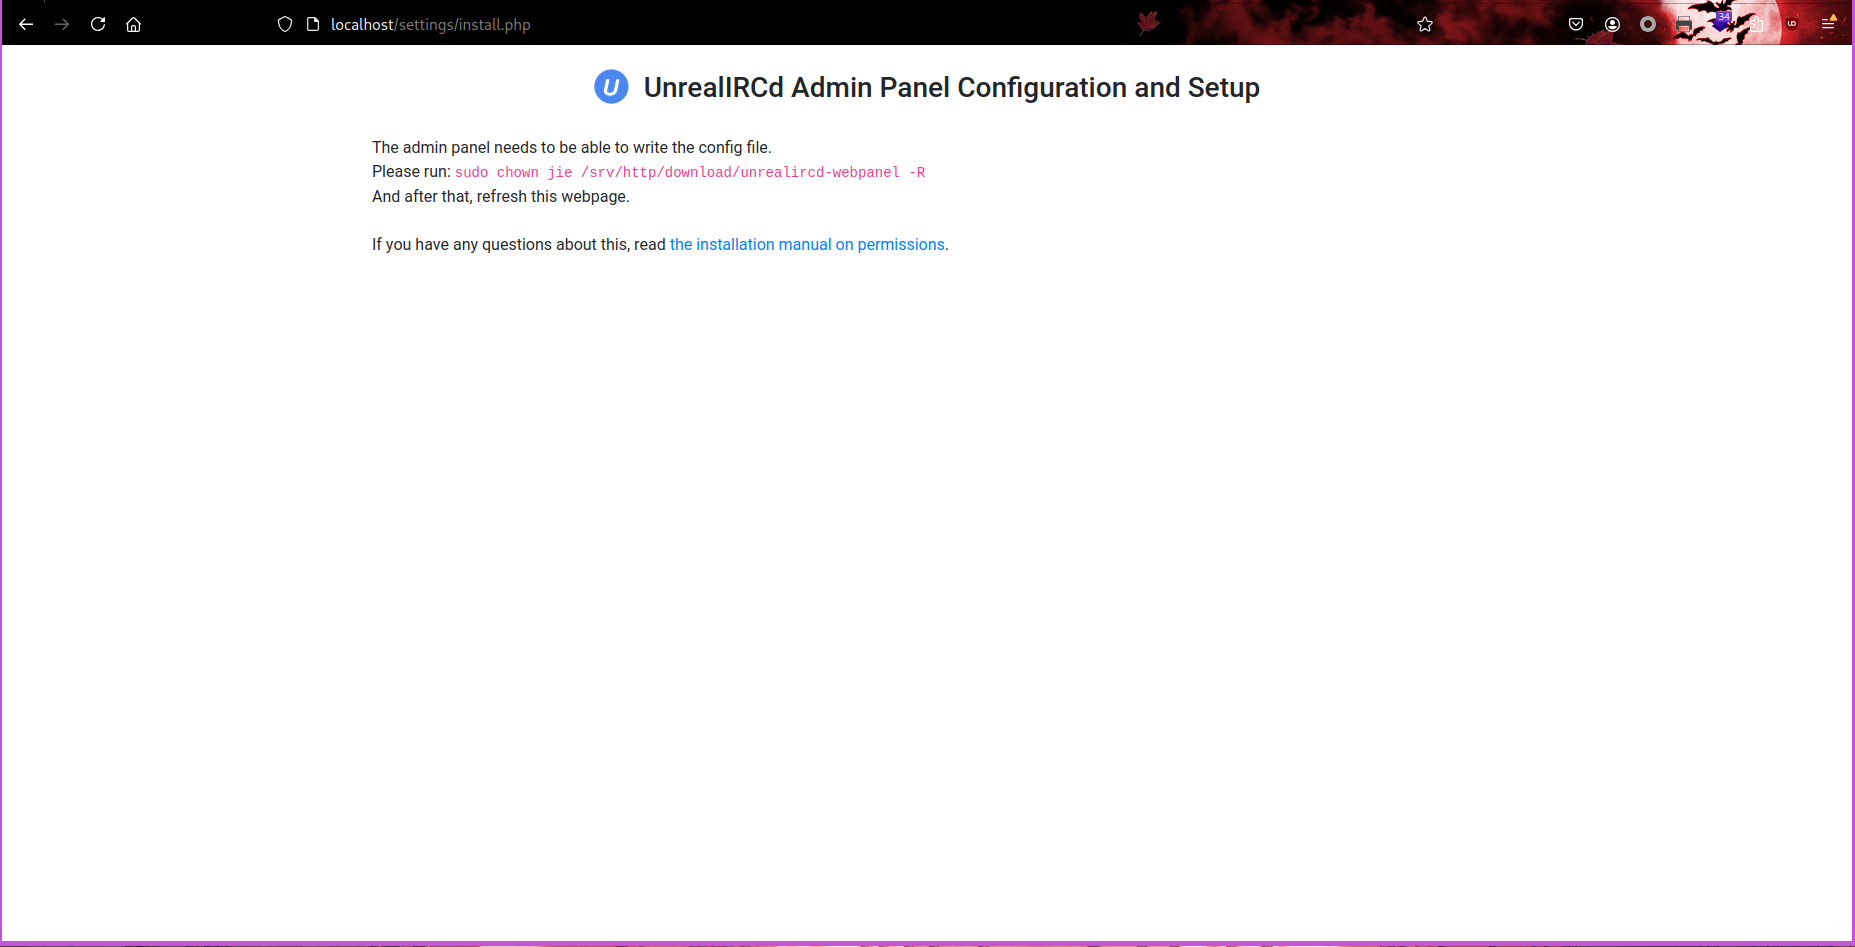
unrealircd-webpanel 目录权限有误

如:

这里的提示命令其实是错误的, 可以查看运行 httpd 的用户是谁, 然后重新修改:

1
ps aux | grep httpd

因此需要运行:

1
sudo chown http:http /srv/http/download/unrealircd-webpanel -R

JSON-RPC

JSON-RPC 提供了一些 API 与 UnrealIRCd 交互, 可获取/修改/添加, 包括 user/channel/severs/bans 等信息. (需要额外配置)

添加 channel history 功能

默认情况下, channel 不会记录历史消息, 可以通过修改 channel mode 来 enable (也需要 client 支持才行).

用 Channel 创建者或者具有 override 权限的 OPER 用户运行:

1
/MODE #channel +H 15:1440
  • +H 表明开启 history 记录
  • 15:1440 记录最近 1440 分钟内的 15 条消息

History 可以在 server 端具体配置, 如:

1
2
3
4
5
6
7
8
9
10
11
12
13
14
15
16
17
18
19
20
21
22
23
24
25
26
set {
history {
channel {
/* How many lines to playback on join? */
playback-on-join {
lines 15;
time 1d;
}
/* How much history to keep. These are the
* upper maximums for channel mode +H lines:time
*/
max-storage-per-channel {
/* +r channels have larger maximums: */
registered {
lines 5000;
time 31d;
}
/* -r channels have less: */
unregistered {
lines 200;
time 31d;
}
}
}
}
}

其中 set::history::channel::playback-on-join 定义了 +H 的行为.

添加 channel 持久化

需要加载 channeldb.so 模块, 在 unrealircd.conf 文件中加入:

1
loadmodule "channeldb.so";

让一个 channel 持久化需要给其加上 +P mode. 先创建一个 channel:

1
/join #hello

之后切换到另一个 window, 需要一个具有 override 的 OPER 用户来修改其 mode (channel 的创建者也不行):

1
2
/OPER
/MODE #hello +P

此时 channel 即为持续的.


建立-IRC-服务器
http://example.com/2024/10/02/建立-IRC-服务器/
作者
Jie
发布于
2024年10月2日
许可协议